Are you searching for the answer to “how to change theme on Instagram?” If your answer is yes, then there is good news! You have reached the end of your search.
Instagram is one of the most used social media platforms on the internet at present. With more than a billion users who use this social media app every day, it is only obvious that the platform keeps releasing several new features from time to time to keep the years engaged and interested.
One of the best ways in which you can personalize the experience of using Instagram is by changing the theme of the app. In case you want to know how to do that, you will find this article to be of help.
Keep reading this blog till the end to learn more about how to change theme on Instagram in 2023…
How To Change Theme On Instagram?
Instagram is a platform that keeps rolling out new features from time to time to make the user experience much better. When it comes to the theme of your Instagram account, there are two options available— the light mode or light theme and the dark mode or dark theme.
By default, the theme of the platform is set to light theme or light mode. However, you can change it if you wish to. If you want to know how to switch the themes on Instagram, you have reached the right place. Keep scrolling to find the answer…
How To Switch From Light Mode To Dark Mode On Instagram?
As I have already mentioned before, the default theme of the Instagram app is set to light mode. You can go from light to dark when and as per your wish by following some really simple steps.
Here are the steps that you need to follow to change the theme of the Instagram account from light mode to dark mode:
- Open your Instagram account
- Click on your profile picture, which is located at the bottom-right corner of the screen, to go to your Account
- Click on the three horizontal lines that are located at the top-right corner of the screen
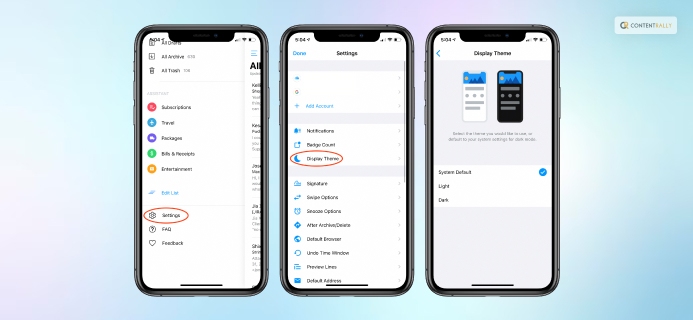
- Tap on the Settings option
- Click on the Theme option that is located at the end of the list
- From the Set Theme menu, click on Dark.
You have now successfully changed the theme of your Instagram account.
How To Switch From Dark Mode To Light Mode On Instagram?
If you are using the Dark Theme on Instagram and want to try to shift to Light Theme, I have you covered. The way to switch from dark mode to light mode is as easy as turning on the switch in a room. All you need to do is follow a set of instructions.
Here are the steps that you need to follow to change the theme of the Instagram account from dark mode to light mode:
- Open your Instagram account
- Click on your profile picture, which is located at the bottom-right corner of the screen, to go to your Account
- Click on the three horizontal lines that are located at the top-right corner of the screen
- Tap on the Settings option
- Click on the Theme option that is located at the end of the list
- From the Set Theme menu, click on Light.
You have now successfully changed the theme of the platform back to the light mode or the default mode.
How To Change Theme On Instagram Chat?
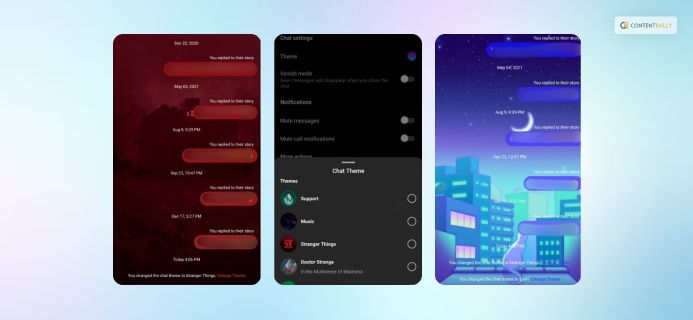
Did you think that changing the theme of the Instagram app is the only thing that you can do on the social media app? Well, that is not the case! If you have the updated version or the latest version of the Instagram app, you can easily change the theme of the individual Instagram chat rooms.
While the classic dark mode or light mode of the app’s DM window is the most popular. A lot of people try to personalize the experience by changing the chat themes when talking to individuals on the platform. With the new Instagram feature and if you have the updated version of the app, you can now not only change the color of the specific chat rooms but also set an all-new theme to the same.
Want to know how to change chat theme on Instagram? Here are the steps that you need to follow if you wish to have a new theme for the chat rooms on Instagram DMS:
- Open your Instagram account
- Open the DM section by clicking on the icon at the top-right corner of the screen
- Search for the account that you want to change the chat theme of
- Click on the username of the account
- In the Details section, go to Chat Settings
- Click on the Theme option
- Click on the option that you want to make the new theme of the chat room.
That is all! You have now been able to change the theme of the Instagram chats. When you wish to change the theme again, you can repeat the steps to select a new theme.
Wrapping It Up!
In case you were searching for the answer to “how to change theme on Instagram. ” I hope that this article has been of help to you. If there are any other queries related to the same, kindly feel free to let me know by commenting on the box at the bottom of the page.
Read Also:
- 6 Best Practices When Buying Instagram Followers
- 5 Marketing Tips to Help Grow Your Business on Instagram
- Instagram Marketing Mistakes That May Get You Unfollowed