How To Recover Deleted Facebook Messages Using Com.Facebook.orca? – With Pictures

Published on: 01 July 2022 Last Updated on: 12 August 2024
How-To-Recover-Deleted-Facebook-(feature-i-mages)

Have you deleted your Facebook messages recently and want them back at any cost? If yes, then this article is for you! Missing important messages can be annoying, especially if you know that it is going to be a tough task to recover them. In this world, it is very difficult to undo most of your actions. But there is a chance to recover your deleted messages on Facebook on both android and PC by using Com.Facebook.orca. 

I understand that many important chats and conversations take place on Facebook Messenger. Facebook is one of the most used social media platforms, with more than 2.7 billion individuals using it all over the world.  

What Is Com.Facebook.Orca?

What Is Com.Facebook.Orca?

Com.Facebook.orca is basically a folder that belongs to the Facebook traveler app. In Com.Facebook.orca folder, all plug-ins, cache, videos, audio files, photos, and other varieties of information are stored.

However, you don’t have to create or download this folder. If you have Facebook or Messenger, this folder is created automatically. You must view the size of the folder from time to time because it takes a huge space on your phone’s storage. 

Thus, if you wish, you can delete this folder by uninstalling the Facebook Messenger app from your Android device. But keep in mind, after deleting this folder, if you wish to recover your deleted messages, you may have to delete your Facebook or Messenger app and reinstall it. This is done to create Com.Facebook.orca folder automatically. 

Will Com.Facebook.Orca Harm Your Device?

As already discussed above that Com.Facebook.orca is a folder that is already installed by default on your device. This folder is created by Facebook Messenger. However, if you have deleted this folder and wish to reactivate it, then you have to reinstall your Messenger.

Now, the main question that arises here is ‘Will Com.Facebook.orca harm your device?” and the answer is absolutely not. It’s just a folder to recover your deleted messages and not a virus that can harm your device.

How To Recover Deleted Facebook Messages On Computer?

How To Recover Deleted Facebook Messages On Computer

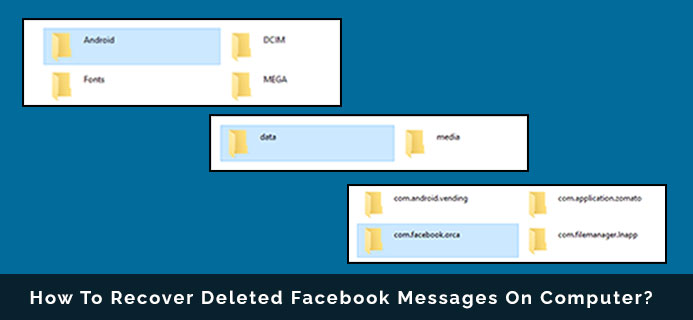
The steps to recover deleted Facebook messages on a computer will differ slightly from recovering deleted messages on a laptop. Thus, the steps listed below are some of the steps that you need to follow for the same.

i). Use a USB cable, and connect your mobile or tablet with the same. Now, go to MyComputer, File Explorer, or ThisPC, depending on your Windows version.

ii). You need to double-click the device to access the file. Again, double click on the internal storage.

iii). Click on a folder named Android and then click Data folder.

iv). Go to the Application folder.

v). Search Com.Facebook.orca, and double click on this.

vi). Then, you will find fb_temp in it. Copy it.

vii). First, uninstall Messenger and then again reinstall it.

viii). Don’t log in to your Facebook Messenger at the moment. First, you need to paste the fb_temp in the cache folder.

ix). Now, it’s time to login using your Facebook account. At the same time, if you get the cache, open the fb_temp file and then select the messages that you would like to be recovered and paste.

That’s all set! All deleted messages will now be displayed on your Messenger app, and you can view this at any time you want to. 

How To Recover Deleted Facebook Messages On Mobile?

How To Recover Deleted Facebook Messages On Mobile

If you want to recover messages on mobile, then the steps will differ from the above-listed ones. Recovering deleted messages on mobile is far easier and simpler, and you will love the steps below for sure.

i). Go to the File Explorer of your device. Don’t use the default file messenger. It is preferred to take the help of a third-party app, such as ES File Explorer. 

ii). Go to SD Card or Storge in the file explorer, depending on your device’s storage location, to recover deleted messages using Com.Facebook.orca.

iii). Click on the Android folder and then tap on Data. Again, click on the Application folder and then on Com.Facebook.orca. 

iv). Then, you will be able to view the cache, and then you can proceed to open that specific folder.

v). Copy fb_temp that you are able to view right now. Create a folder and paste it over there.

vi). Uninstall Facebook Messenger after completing the above steps. 

vii). You can go to the Cache folder after installing the app—paste fb_temp in the cache folder.

viii). Then, again reinstall it using your Facebook account. Soon, you will be able to see and access all your erased messages.

Steps To Fix Com.Facebook.orca Error

Steps To Fix Com.Facebook.orca Error

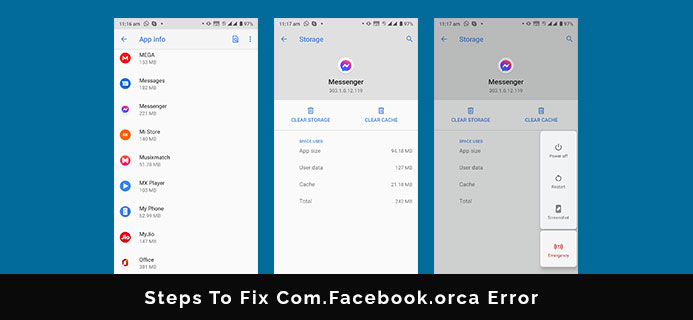
Sometimes, you may face Process Com.Facebook.orca errors as this may have stopped working. The process could end abruptly or shatter whenever there is an issue. This error generally occurs when an app or any technical issue affects the smooth running of the Facebook or Messenger apps.

Now, to fix Com.Facebook.orca error, you need to follow the below steps. Have a look!

  • Open Settings on your android device.
  • Find Applications on Setting and click on it. Use the Search bar to find this folder. 
  • In the Application folder, you will get an option of All Apps.
  • Then, search for the Messenger app on the listed apps and then select ‘Clear All Data.’
  • You may be required to restart your Android device and open your Facebook or Messenger app and use them like before without any difficulties. 

Thus, this indicates that Com.Facebook.orca error has been solved. Another way to solve this error is to install the app and reinstall it from your Google Play Store.

Can You Recover Deleted Facebook Profile?

You can, of course! The company has increased the grace period for deletions from two weeks to thirty days.  This implies that you have approximately a month from the time you delete your Facebook account to change your mind. Facebook later extended the grace period because, according to the company, they saw many users attempting to recover their deleted accounts even after two weeks had passed.

As a result, users must now wait up to a month for the account and all of its contents to vanish forever.

Frequently Asked Question

Q1: Is There Any Difference Between Facebook Katana And Facebook orca?

Facebook Katana is a codename for the Facebook applications on Android devices. Orca is for messenger applications. And Facebook. Katana is the code name for a Facebook application. This is the difference between the Facebook Katana and the Facebook Orca.

Q2: Can Anyone Retrieve The Facebook Secret Conversations?

Any type of secret conversation has the keys for encryptions. It can disappear after a certain time. But Facebook can still have access to the decryptions. The secret conversions of Facebook can be retrieved.

Q3: How To Know That Someone Has A Hidden Message On Messenger?

If someone has hidden messages, you can easily tell by seeing their message bubbles. Usually, the message bubble’s colors are blue. But when you have the secret chats, the colors turn black. By seeing the colors, you can tell if the messages are hidden or not.

The Final Thoughts

Facebook accounts are reflections of our lives, memories, and relationships in the wide world of digital interactions. Even though it might seem difficult to recover an account or even a message that has been permanently deleted after 30 days, it’s important to keep in mind that there are procedures and safeguards in place to help.

Make sure you are always aware of the consequences of the decisions you make online. In the event that you encounter a comparable circumstance once more, consult this guide and act quickly. Always remember to stay informed, stay connected, and protect your digital memories.

Now, you know pretty well how to use Com.Facebook.orca to recover your deleted Facebook messages on both your computer and PC. So, now you know that there is a secret folder (Com.Facebook.orca folder) lying on your Android device. Hence, the above steps will help you to get your lost messages on Facebook easily.

Read Also:

Content Rally wrapped around an online publication where you can publish your own intellectuals. It is a publishing platform designed to make great stories by content creators. This is your era, your place to be online. So come forward share your views, thoughts and ideas via Content Rally.

View all posts

Leave a Reply

Your email address will not be published. Required fields are marked *

Related

how to disconnect facebook from instagram

The Whys And Hows Of Unlinking Facebook And Instagram In 2024!

Have you had enough of sharing your content on Facebook and Instagram in tandem? Would you prefer to maintain distinct accounts? Are you looking for ways "how to disconnect Facebook from Instagram?" You can easily delink your Instagram and Facebook accounts from one another on desktop and mobile platforms, but how do you do that? We'll walk you through the process of separating your Instagram and Facebook accounts in this post. You can start by de-syncing your desktop and mobile accounts for Facebook and Instagram. If you decide you no longer want to cross-post content, then you can easily unlink your accounts. If you have more than one linked account, you can also delete an account from either platform. Remember that you will need to change one of the passwords if the login for both accounts is the same. It is also possible to delete your Instagram account from other social media platforms. You can unlink your Instagram account from your Facebook account by going to the Accounts Center if you want to stop posting your Instagram photos to other social media platforms. We'll guide you through the process of removing the connection between your accounts as well as ceasing to share your Instagram posts on other platforms. How Is Facebook And Instagram  Connected Your Instagram posts will automatically be shared on your Facebook timeline if your Facebook and Instagram accounts are linked. For individuals who would like to share their Instagram photos with their Facebook friends without having to post them twice, this feature is useful. You can unlink your Facebook and Instagram accounts if you'd rather keep your accounts separate or are done sharing content between them. When you link them, you are essentially giving Instagram access to your Facebook account when you link your two accounts. This implies that Instagram has access to personal data from your Facebook account, including your email address, name, as well as a profile picture. Furthermore, Instagram can post on Facebook on your behalf. So, you might want to unlink your Instagram and Facebook accounts for many reasons. Why Unlink Facebook From Instagram? Do you want your Instagram and Facebook accounts to be kept apart? Does cross-posting content across the two platforms sound too monotonous? Do you want Instagram to no longer be able to access your Facebook account? Take these steps to unlink your Instagram and Facebook accounts: Log in to your Instagram profile by opening it. Choose "Settings" by tapping the three lines in the upper right corner. After swiping down, choose "Account." Click on "Sharing to Other Apps." After selecting "Facebook," tap "Unlink Account." Remember that removing the connection between Instagram and Facebook accounts won't remove any of your content from either site. All it does is cut off the communication between the two accounts. Why Would You Unlink Facebook From Instagram? You might want to keep Facebook and Instagram separate in case you use them for personal connections on Facebook and business or creative endeavors on Instagram. You can avoid confusion as well as overlap by keeping your identities separate by unlinking the accounts. It's possible that you unintentionally share your Instagram reels, stories, or posts on Facebook when you link your accounts. In case your target audiences on both platforms are different, this might be awkward or inappropriate. You'll have more discretion over what you share and where by unlinking the accounts. When you automatically share your Instagram posts on Facebook, or vice versa, this is known as cross-posting. Although it may seem practical, your followers may find this bothersome or spammy. By removing the links between the accounts, you can customize your content for every platform and avoid cross-posting. Unlinking your Facebook and Instagram accounts can be a wise move if you're worried about privacy on social media. It will lessen the chance of any security lapses or hacks and stop any data or information from being shared between the two platforms. How To Disconnect Facebook From Instagram On Mobile? You can unlink your Instagram and Facebook accounts if you no longer want them to be connected. Here is how you can do it using your smartphone. Launch the Instagram app on your smartphone. Tap the lower right corner of your profile picture. In the upper right corner, tap the three horizontal lines. At the bottom of the menu, tap Settings. Press the "Account" button. On Linked Accounts, tap. Press the Facebook icon. Select "Unlink Account" by tapping. Your Instagram and Facebook accounts will be disconnected after you've finished these steps. How To Disconnect Facebook From Instagram On Desktop? The procedures listed below can also be used to unlink your Facebook account from Instagram if you're using a desktop or laptop web browser: Open your web browser and navigate to instagram.com. If you are not already logged in, log into your account. In the upper right corner of your profile picture, click on it. Select Settings by clicking. Select "Account" by clicking. On Linked Accounts, click. Select Facebook. Select "Unlink Account" by clicking. How To Disconnect Facebook From Instagram On iOS Or Android? If you want those posts removed from Facebook, you will have to remove them manually. It's easy to unlink your Facebook and Instagram accounts on your mobile device if you decide you no longer want to share content between them. Here are the steps that apply to both iOS as well as Android devices.  iOS  Tap the icon for your profile in the lower right corner of the Instagram mobile app after opening it. In the upper right corner, tap the hamburger menu icon, then choose "Settings" from the menu. After swiping down, tap "Account Center" (or, depending on where you are, "Accounts Center"). To unlink an Instagram account, tap "Accounts & Profiles" and choose the desired account. Again, tap the account name and profile picture. Select "Remove Account" and tap "Yes" when prompted to confirm.  Android  Tap the hamburger menu icon located in the lower right corner of the Facebook mobile app after opening it. After swiping down, tap "Settings & Privacy" and then "Settings." Click "Accounts Center" and choose "Manage Connected Experiences" from the menu. To unlink an Instagram account, tap on it. Select "Remove" and then "Remove Account" from the prompt to confirm. It's crucial to remember that you cannot unlink your Facebook and Instagram accounts if you use the same password for both. You must change one of the passwords. Furthermore, you might need to go to the app settings or preferences of that social network to unlink your previous account in case you wish to relink your Instagram account to it. Why You Can't Unlink  Facebook From Instagram? Try these suggestions in case you are having trouble unlinking your accounts: Verify that you are running the most recent versions of the Instagram and Facebook apps. To confirm that you have granted Instagram access to your account, check your Facebook settings. Verify that you are logged into the correct Facebook account if you have multiple accounts. If you're still having issues, then get in touch with Facebook or Instagram support for additional help. Wrapping Up Removing the connection between your Instagram and Facebook accounts can help you maintain privacy as well as segregate your data. Additionally, it can stop unwanted content sharing between the two platforms. You must go to the "Linked Accounts" section of your account settings to unlink your Instagram and Facebook accounts. You can then choose which Facebook account to deactivate and take it out of your Accounts Center. If you have thoughts to share or questions to ask about how to disconnect Facebook from Instagram please leave a comment below. We would love to hear from you. Learn More About: 5 Content Ideas to Use with Instagram Influencers 6 Best Practices When Buying Instagram Followers Incognito Mode: How To Post Anonymously On Facebook?

READ MOREDetails
Facebook Authentication App

Beyond Passwords: The Future Of Security with Facebook Authentication

It can occasionally be unsettling to realize that anyone can access your Instagram and Threads accounts using your Facebook logins. Yes, making a strong password helps keep hackers out of jail, but what if they figure out what it is? This is the reason behind configuring Facebook two-factor authentication. In this article, we will discuss about Facebook authentication apps that will help you keep your passwords safe. Often referred to as 2FA, it strengthens the security of your account. It requests a verification code from your device each time you try to log in. In this manner, even if someone knows your username as well as password, they still need access to your phone in order to log in. Facebook Authentication App Here's how to set up two-factor authentication on your account from an Android phone, an iOS device, or a web browser, regardless of whether you prefer to use a hardware security key, SMS, or an authenticator app. About Facebook Two-Factor Authentication Two-factor authentication is a standard industry practice for security. Also known as multi-factor authentication, the feature adds an extra layer of security to the app. It not only requires your username and password but also access to any information that only the user has. Facebook Authentication App: How To Activate  On Mobile Device Facebook provides two-factor authentication via SMS, physical security keys, as well as authentication apps. But in most situations, you will probably use the first two. Because a Facebook authentication app is more convenient than SMS and does not require a separate hardware device. The platform suggests using them. In either case, the setup should take less than a minute. Press the three horizontal lines located directly beneath the Facebook Messenger icon on your home screen. This will cause your Facebook profile's menu to open. Navigate to 'Settings & privacy' - the cog-shaped icon is located in the upper right corner of the Facebook app. Select 'Password and security' from the 'Account' settings menu. Navigate to 'Two-factor authentication' by scrolling down this menu. Choose between an SMS or an authenticator app for two-factor authentication security. After selecting, click "Continue." The third-party authenticator, which you can download from many sources if it isn't already installed, will need to be set up. 'Set up on same device' will save the app key if you have the Facebook app. Verify the request to store the key. Choose 'Text message' (SMS) from the 'Select a security method' menu if you wish to use an SMS as your security method or as a fallback in case your authenticator isn't working. Click 'Continue' after choosing the phone number linked to your Facebook account or entering an alternative number to which you would like a code to be sent. Facebook will contact the number you provided with a six-digit code. Press 'Continue' after entering the code. If someone tries to access your account from a device or browser that is not recognized, you will receive a code via text message as part of the active two-factor authentication process. How To Activate Two-factor Authentication For Facebook On Web Browser? Similar steps apply if you primarily use Facebook on a computer to enable two-factor authentication. Here is how you can get the Facebook authentication app for your browser: Go to account settings from your home screen. A thumbnail of your Facebook profile picture will appear there. Navigate to 'Settings' by opening the drop-down menu and selecting 'Settings & Privacy' (the image resembles a cog). Locate and click on the "Security and login" link located on the left side of the screen. Choose "Use two-factor authentication" after swiping down to the "two-factor authentication" menu item. Decide on a two-factor authentication technique. Facebook suggests utilizing an authentication app. You can use Duo Mobile or Google Authenticator. You'll see a QR code on the screen. Use your authenticator app to scan it. Verify the request to store the key. Your account now has an additional layer of protection thanks to the activation of two-factor authentication. Choose 'Text message' (SMS) from the 'Select a security method' menu if you wish to use an SMS as your security method. Or you can use it as a fallback in case your authenticator isn't working. Click 'Continue' after choosing the phone number linked to your Facebook account or entering an alternative number to which you would like a code to be sent. Facebook will contact the number you provided with a six-digit code. Press 'Continue' after entering the code into the box after it appears in a message marked as coming from Facebook. If someone tries to access your account from a device or browser that is not recognized, you will receive a code via text message as part of the active two-factor authentication process. Wrapping Up It is recommended that you utilize the additional Setting Up Extra Security Options while you are in there.  Activate the feature that notifies you of unidentified devices as well as designates three to five friends for when you lose access to your Facebook account. This is a straightforward process that you will be guided through, but you DO need to inform your selected contacts that they must complete it on their end. You will notice the blue "on" indicator indicating that these securities are in place if all three of these have been successfully set up. Finally, remove the extras from any Facebook accounts you may have. In order to conduct business on Facebook, such as managing Facebook pages, running advertisements, and/or using Business Manager, you should only have one personal Facebook account that is configured with two-factor authentication. If you have thoughts to share or questions to ask about the Facebook authentication app, please leave a comment below. We would love to hear from you! Additional Reading: How to Get Help Through Facebook Chat Support? What Is Facebook Touch? Everything You Need To Know About It Facebook Settlement: What Went Down And What Was The Final Result?

READ MOREDetails
how to delete a facebook page

Here Is How To Delete A Facebook Page Easily

Do you wish to know how to delete a Facebook page? This article is going to be your ultimate guide. We will walk you through the process of deleting your Facebook business page on both desktop and mobile devices with clear, detailed instructions. If you're still not entirely sure that you want to permanently delete your Facebook business page, we'll also offer you other options. But first, let's confirm that we are discussing the same topics. Your personal Facebook account, or profile on Facebook, is the one you use to interact with loved ones and watch wacky cat videos. You can share updates about your life with your Facebook friends and keep up with their activities. Depending on the pages you follow, you can even obtain your news from your news feed. On the other hand, a company typically creates a Facebook page to engage with clients, advertise goods and services, and broaden its online presence. This account is not private; rather, it is a component of a larger marketing plan. We'll go over everything you need to know about removing your Facebook business page in the section that follows. Go to the bottom of the post to find out how to remove your personal Facebook account. How To Delete A Facebook Page: Prerequisites? You have to be the page administrator if you want to remove your Facebook business page. If you are unsure whether to remove your page, you might want to think about un-publishing it first. You will not lose any data, so you can publish it again whenever you'd like. You have 14 days from the time you start the deletion process to reactivate your page if you decide later that you should have deleted it. For 14 days, the page is also accessible to the general public. Two Alternatives To Deleting Facebook You have a few options if you're not sure you want to remove your Facebook business page permanently. Your page can be merged with another page or made unpublished. For those who want to keep their Facebook page private for the time being but may want to use it later, the first option is excellent. With the second option, you can delete the old Facebook page and move its fans to the newly created one. Everyone wins in this case! Un-publish There are a few reasons why you might want to un-publish your Facebook business page: It's possible that your outdated Facebook page needs an update. It's possible that you are working on a new Facebook page and don't want it to be public until everything is finalized. Maybe you made a Justin Timberlake fan page a long time ago, but it doesn't feel like you these days. You're not sure if you should permanently remove your Facebook page. To un-publish your Facebook page, follow these steps: Visit Facebook. Click Pages in your News Feed (it's on the left menu). To un-publish a page, click on it and select Page Settings. After selecting General, select Page Visibility. Choose "Page unpublished." To save your changes, click Save. When you un-publish your page on Facebook, it will ask you why. Explain why. To un-publish, click Next. So that's it! To republish your Facebook page, just follow the same steps and select "Page published" in the fourth step. Merge Facebook Pages Another option is to merge the Facebook pages in order to avoid deleting it completely. Here is how to do it: Launch the Facebook application. Click the hamburger menu in the upper right corner. Select Pages. A list of all of your Facebook pages will appear. Select which one you wish to combine. Choose Settings. Click General. To merge pages, click. Facebook will prompt you to enter your password. Selecting the two pages you wish to combine will be necessary. The following conditions must be fulfilled by your pages in order for the merger to proceed: Only if you are an administrator on both requested pages can you combine them. The pages must all deal with the same subject. Both the names and the content of the pages must be similar. If applicable, all of your pages must be located in the same physical location. How To Delete A Facebook Page? Maybe your business closed, the band broke up, or you simply don't want a given page to be out there anymore. If you find yourself ready to delete a Facebook page, it is easy to delete it. You can do it through the main site as well as the Facebook app. Here are the steps in detail: Log into your Facebook account. Navigate to the page you want to delete by clicking your profile icon at the top right of the page. Click to see all profiles and select the page. On the page to be deleted, click settings in the left-hand column. Click privacy on the left of the next page. On the next page, click Facebook page information. Look beside the words deactivation and deletion. Click view. You will be taken to a page with two options: deactivate the page and delete the page Select the delete page, then hit continue. A new window will pop up asking if you want to download and or transfer information on the page. Make your selections, then hit continue. Enter your password when prompted, then hit continue. Now hit continue on the next window, noting that the action you are about to take is permanent, or it will be if you don't cancel the deletion by reactivating the page within 30 days. Open the Facebook app and click the menu. Located at the bottom right of the screen on an iPhone and the top right on an Android. Tap pages, then tap the page you wish to delete. Open the page's settings, then tap General. Tap the remove page on the next window, then tap the delete page button. Confirm your choice in the next window and delete the page. You have 30 days to reactivate it and stop the deletion. How To Delete a Facebook Profile? Now that you know how to delete a Facebook page, if you want to delete your personal Facebook profile or account, follow these steps: On the top right of Facebook, click Account. Click Settings and Privacy and choose Settings. On the top left, click Your Facebook information. If you want to, you can download a copy of your information in the section download your information. Why Can't I Delete My Facebook Page? You do not have administrator access to a Facebook page if you are unable to delete it. If it's a page that someone else made, you can either follow the above instructions to have Facebook handle the deletion for you, or you can contact them directly if you know them. Your admin status has changed if it's a page you know you created and should be able to remove. If you want to remove the page, you'll need to be added back as an admin because it's possible that someone else with admin access accidentally or purposely changed your role. Can Admins Delete A Facebook Page? They most definitely can, yes. In actuality, the ability to remove a Facebook page requires that you are an admin or that you have been given permission. Any Facebook page you create automatically gives you admin privileges, so when it comes time to delete one, just follow the previously established procedures. You must request access if you are not the page administrator and would like to delete the page. How To Stop Facebook From Getting Deleted? As previously mentioned, you can stop a page from being deleted for thirty days after you decide to delete it. If you decide to change your mind, simply take these actions: Click on your picture in the upper right corner of Facebook when it's open. From the dropdown menu, select Settings & privacy and then click Settings. Click "Your Facebook information." Lastly, select "View" from the menu, then click to bring up the reactivation page. Before You Delete You should download the data from your Facebook page before deleting it. To obtain your data: Navigate to that page and choose "Settings." Locate the "Download Page" option by navigating to the "General" section. Click "Download Page" after selecting "Edit." One wise move to make the most of your social media assets is to delete any outdated or irrelevant business pages. You can also collect data, automate content creation, and analyze trends with the right software. To locate the best social media software for your company, start here. Wrapping Up A Facebook page is different from a profile. Your user profile represents you as an individual. It's where you interact with friends and maintain control over the privacy of the information you share. A page is a public representation of a person, place, business, organization, or group that other people on Facebook can like and follow. Once you have initiated your account's deletion, Facebook gives you a 30-day window to rescind your decision. Within that timeframe, you can reinstate your account to its previous glory without losing any of your data. To do so, simply log into your account as you normally would, using any browser of your choice or via the Facebook app. After 30 days, you lose your account permanently. So before you get too curious about how to delete a Facebook page, make sure you are ready to let go permanently. With the information we just provided, you can delete any type of Facebook page that you may have created in just a few moments. Have you experienced any challenges while trying to delete your Facebook page? How did you overcome it? Let us know in the comments. Additional Reading: How To Stop Scammers On Facebook Marketplace? Facebook Settlement: When It Will Pay Out and How to Verify It What Is Facebook Touch? Everything You Need To Know About It

READ MOREDetails