How To Arrive At The Perfect Choice Of A Potting Bench For Your Gardening?

Published on: 19 August 2019 Last Updated on: 04 November 2024
Potting Bench

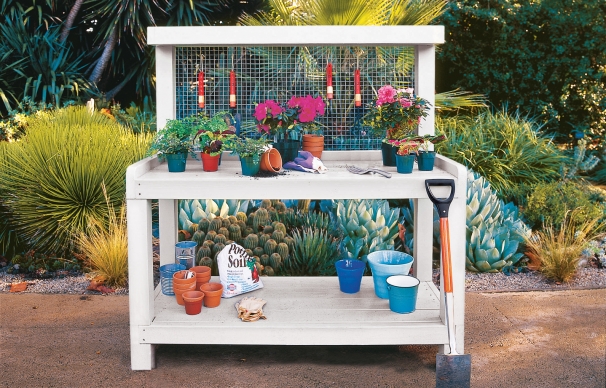
A potting bench provides a good-sized work surface and a designated place to keep your tools and supplies organized. It is a must-have staple if you take gardening seriously. It saves your back from stooping over low work surfaces and can double as an outdoor bar.

There are tons of potting benches out there. So how do you pick one that is perfect for your needs? Keep reading, and you will find out in a bit.

How To Arrive At The Perfect Choice Of A Potting Bench For Your Gardening:

Height:

One of the advantages that potting benches offer is the ability to work without bending over. This means that the height of the ideal potting bench should be something around that of an average kitchen sink or counter. This can be something in the range of 36 inches.

That said you may prefer a slightly higher or lower potting bench depending on your height, age, and level of fitness. Just make sure that the height of the potting bench you choose is perfect for your needs. Your best bet might be to opt for any of the garden potting table for sale that comes with adjustable height mechanisms.

Material:

The material of your potting bench should be dependent on where you intend to keep it: indoors or outdoors. If it is going to be outdoors, the chances are that it will get exposed to atmospheric elements and will naturally become dirty and wet. A potting bench kept indoors will be less exposed in this regard and will not get so wet or dirty.

Regardless of where you intend to keep it, your potting bench must be durable if it is going to be of any use to you. Immaterial of the Type of potting table you choose – wood, metal, recycled plastic or vinyl — ensure that the material will be sturdy enough to withstand the weight of the pots and the onslaught of the elements.

Surface:

Whenever you want to pick a garden potting table for sale, there are some questions you should ask yourself. What are your gardening needs? How much room do you need for the pots you use? The answer to these questions will direct you on the lookout for a perfect potting bench.

If you do not need too many pots, you should settle for those potting benches that are about the size of a large table or a kitchen counter. But if that does not work for you could, just get a garage workbench and customize it.

Storage & Functional Features:

Your potting bench can also serve other needs. It could be used as a bar or for storage. Therefore ensure that you look out for these features when you are looking for a potting bench. You will need a bench with shelves, drawers, and built-in troughs. This is because you will need some extra space for storing gardening equipment and a trough for holding extra soil.

Gardening is fun when you have the right equipment and tools. With the hordes of retails stores, how do you get genuine equipment without stress? Garden Suppliers marry quality products with prompt, effortless delivery. Get your premium gardening equipment with ease, anytime.

Read Also:

Featured image: thisoldhouse.com

Content Rally wrapped around an online publication where you can publish your own intellectuals. It is a publishing platform designed to make great stories by content creators. This is your era, your place to be online. So come forward share your views, thoughts and ideas via Content Rally.

View all posts

Leave a Reply

Your email address will not be published. Required fields are marked *

Related

carrot

Can We Grow Carrots All Year Around?

Carrots are root vegetables. They vary from purple to red in color but most commonly found are bright orange ones. The orange color of carrot is due to its high content of beta-carotene. This helps suffice our body with necessary levels of vitamin A, which is required for proper functioning of our immune system. Yes, we can grow carrots all year round! Also, you may grow it anywhere, even in our small kitchen garden or as a potted plant. You must know how to grow and harvest carrot before you start the procedure of producing carrots yourself. I conducted various kinds of research including reading online resources and talking to farmers in my town before going ahead with carrots plantation. This is so because carrots are a low-acid plant and can catch contamination easily, which may make it inappropriate for human consumption. When can we Grow Carrots? Carrots are biennial plants that are they grow twice in a season. However, the seeds and flowers grow only in cold season. They take ten to twelve weeks to reach their full growth. They can be sowed in spring just before two weeks of the last frost date. In cold climate, we can continue to plant them every three weeks till mid-summer. Then again they can be sowed in summer for winter products that are due in next ten to twelve weeks. Preparing the soil First, you need to judge the solid where you want to plant your carrots. If the soil is sandy or clay soil, then it is not appropriate for growing carrots. Sandy soil and clay soil cannot retain nutrients and lacks good soil structure, which makes them inappropriate for growing carrots. Salty and loam soil is the best kind of soil for growing any vegetables. There is another variety of soil that is chalky soil. This is also not appropriate for growing carrots due to its alkaline nature. Read also: Does Organic Gardening Improve Soil Quality? Sowing Carrots Before sowing carrots, you need to dig in the soil well to about twelve to fifteen inches. Once done, you can introduce some earthworms and crawling critters who make the soil appropriate for growing carrots. Earthworms consume the organics from the soil and then scatter it throughout the soil to make the soil more fertile. Similarly, crawling critters would keep the bugs and insects away from the soil from harming the crop. You should be cautious about using chemicals to kill insects as they also take away the good part of the soil. Always organic gardening is recommended for the growth of any crop as organic gardening improves soil, its overall structure and gets it ready for next cycle as well. You can sow your carrot seeds into the sowing beds created three inches apart. The carrot seeds are very small so to distribute them evenly; you can mix them up with the sand and then sprinkle them into the sowing Cover the field with some warm blanket or a shield to avoid the tiny creatures from ruining your crop. This should be kept covered for at least three weeks to let the healthy growth of the crop. Carrot Sprouts While you decide to plant carrots, you should also be aware of how a carrot sprout looks like to differentiate it from other sprouts or just weed. The sprout is breaking out of the soil may be of cabbage or potato or some grass. Well, then how does carrot sprouts look like? You can very easily identify them. From the perspective of their appearance, they look like ferns or palm leaves. Well if that’s not all for you, then you can take the leave in your palm and crush it with your nails. Now smell the crush, and it will be like one of carrot. That’s how you can very easily identify the carrot sprouts from other growing vegetables and weeds in your kitchen garden. Harvesting Carrots You can judge the growth of the carrots by looking at their roots. The size of the roots is a good indicator of the growth of your carrots. You can pull them out in three weeks to enjoy baby carrots of wait for next ten to twelve weeks for fully grown carrots. Storing Carrots Now is the question of how to store carrots for prolonged use. You can seal the carrots in a polythene bag and store them in the coolest part of your refrigerator. One should never wash carrots until they need to be used as added moisture ruins carrot structure earlier. You can also store carrot in a box and cover it with a layer of sand. This will also help you preserve carrots for long. You can very well enjoy your garden-fresh carrots all year round once you know how to sow and harvest them. You can use them in a variety of ways in your kitchen like caramelize then with sugar syrup or bake a carrot cheesecake or eat them raw as part your daily salads. We have a lot of questions making rounds by our readers; therefore, in case, you have any further questions on how to grow carrots, or anything related to sowing or harvesting or storing them, then please comment below. Read also: Lawn Care Maintenance Services And Tips Smart Fun Gardening: How To Take Care Of A Money Tree

READ MOREDetails
Small Kitchen

Small Kitchen Storage Ideas

If you have a small kitchen, you could find it challenging to organize it and keep your space clutter-free. When you continue to struggle with small kitchen storage, then it’s time to assess how you organize everything. This will help you maximize every inch of kitchen space and ensure that no valuable space is wasted. Top-rated house cleaning in Tucson goes over step by step how to accomplish this task. How To Organize Small Kitchen If you are struggling with storage space, here are a few affordable small kitchen storage ideas to make life a little easier. 1. Tension rod No doubt, a small kitchen could mean having a tough time arranging essentials. But a tension rod can come in handy, especially to keep cleaning supplies safely. Hang your kitchen cleaning supplies from a short tension rod where they are easy to access. What’s more, you can hang rubber cleaning gloves on the tension rod. Your dish-drying towels too can be hidden from plain sight on a tension rod installed in the cabinet. 2. Use up the wall space Another small kitchen storage idea is to leverage the wall space to store kitchen accessories. Free up the drawer space and use the walls instead of clutter-free storage. You may stash knives on a magnetic rack to make access easy when food preparation is underway. 3. Stack on the rack One interesting small kitchen storage solution is to locate a bookshelf near the kitchen to store mist essential cooking supplies. You may leverage the space to stack spices, dishware, and even cookbooks. 4. Hang baskets When it comes to organizing a small kitchen, baskets can come in handy to stack kitchen utensils and cleaning supplies. Better still, you may hang a couple of baskets above a sink to leverage the vacant space. It’s one of the best ideas to stack wet dishes and sponges for quick drying. Another stylish kitchen storage solution is to hang a wire basket from the ceiling. It could be single or multi-tiered, depending on your storage needs. You can store potatoes, onions, garlic, and any other stuff that also adds visual interest to your kitchen. 5. Floating shelves Another kitchen storage idea is to add a pair of floating shelves for that extra storage space. This comes in handy if your kitchen lacks room for cabinetry. Easy to install, floating shelves can be hung just about anywhere – even under the bottom shelf. You can hang hand towels, utensils, or coffee mugs. 6. Corner drawer A small kitchen has little space. But with some creative ideas, you can create smart kitchen storage solutions. The corner drawer is one such space-saving storage idea in a small kitchen, especially for awkward corners. These drawers connect the corners diagonally. As a result, they can pack a lot of stuff that horizontal cabinets cannot. 7. Utensil drawer When your small kitchen lacks space for crockery and silverware, opt for a built-in utensil drawer. One similar DIY solution, which is affordable as well, is to place stainless steel pots in a deep drawer that has little space. Use these pots for holding small kitchen accessories. 8. Adopt a pantry Another way to make a small kitchen look bigger is to de-clutter the space by adding a pantry. It is a good storage solution that provides easy access while freeing up the burden on over-stuffed cabinets. 9. On-the-go space A portable kitchen trolley is a handy addition to a small kitchen. Take it anywhere while it safely stores bulky items. It works like an excellent solution to wheel food to the dining table. 10. Wall-mounted cabinets Get a little creative with the kitchen décor when you are looking for tips to organize a small kitchen. You may choose a mix of open shelves to show off your favorite cutlery and wall-mounted cabinets to keep stuff out of sight. Leave some gap between the two to create the impression of extra storage. Picture ledges and hooks can free up the work surface and spruce up the décor. 11. Velcro strips Velcro strips can come to your rescue in a small kitchen, where you are short on storage space. Attach these strips in two spots to hang towels and other similar stuff to save space. 12. File folders as racks While a file folder sits empty in your garage, why not put it to the right use in the kitchen? You may be surprised to see that it can be used smartly to organize your kitchen. They come in especially handy to store your kitchen cleaning supplies. Just place all the supplies into the file folders and you do not have to worry about a shortage of space. Read Also: The New Trend: Drawer Boxes 7 Expert Hacks for Downsizing to a Smaller Apartment Design your Kitchen According to Your Budget and Work in Organized Manner Top Secrets That Slash Your Kitchen Remodeling Bill in Half 10 Unique Kitchen Hacks to Save your Time in Kitchen and Cooking 7 Unique Kitchen Design Ideas That Your Family Will Enjoy

READ MOREDetails
slider-img

Tips to an Adjusting and Fitting Bi-Fold Doors

When it comes to bi-fold doors, a lot of people prefer using their own handyman skills instead of hiring one. The thing is that though you can easily fix up a problem like adjusting the height or making the door a bit less creaky using your skills, it is not really possible for everyone to actually install the entire door themselves. In this reference, you should remember that though you actually try to save up a bit on the cost of the door, you purposely cause yourself more harm because if the door is not set right, it might just crash causing injuries and damage. Remember that an average price of the bi-fold doors can be in between $50 to $150. And if you actually hire someone for this purpose, you can pay a similar amount for the installation. So, it is tempting to implement the entire process yourself. But the problem is that if you go wrong here, then it could just cause more damage than good. It is really not that hard because these bi-fold doors just need a tiny bit of patience. Doing so can help you get the benefit of installing the entire door yourself, with minimal supervision. You should remember that, if there is any remote chance that your handyman skills are not that good, you should hire an expert. Here’s a few aspects to evaluate- One of the first things you should do here is understand where you need a new door. In most cases where you have bi-fold doors that have been around for years, a bit of adjustment and fitting tricks tend to do the job. You can try lubricating the door using some oil or simply get ahead with the adjustment using some of the tips that are mentioned at the end of this article. But there is a long list of things that can go wrong in this reference. One of the major problems that individuals face here is the door or the fitting not opening the right way. It is vital that the height along with the width be measured accurately, so that when you adjust these bi-fold doors, your setting is just right. Another aspect is that you can try tipping panels. The first step is to consider the size of the door and ensure that you cover all the steps of taking down the door correctly. Any mistakes here, then you have trouble setting them back again. You should also ensure that the alignment and fastening is done properly so that in post repairs, there is no risk in using these bi-fold doors. Also, the hardware needed for this process should be kept alongside because a little lapse here means you are holding the door with no screwdrivers to put things back in place. Adjusting the doors When you adjust the bi-fold doors, ensure that you first loosen the screw that sits on the top of the bracket and then slide the same slightly. This should be done along with tracks to leave enough room between the top and your door. Then again tighten the screw and close the door to check. For the floor bracket, you have to shift the pins on either door bottoms. In one case you have to loosen a screw that slides the bracket in and out. To adjust the height, you have to just screw the bottom pin using a wrench and pliers. This can be done without taking off the door too. So, it is better to hire an expert to fit the bi-fold doors if you don’t find it easy to do the same by yourself.

READ MOREDetails