Google Play Cancel Subscription: The Ultimate Guide To Managing Your App

Published on: 11 October 2023 Last Updated on: 30 July 2026
Google Play Cancel Subscription

Are you searching for how to cancel a subscription on Google Play? Well, you are not the only one. In the fast-paced digital age we live in, it's common for many of us to sign up for various app subscriptions.

These subscriptions can range from streaming services to premium versions of our favorite apps, promising a world of convenience and entertainment at our fingertips. However, as time goes on, we often find ourselves with a growing list of subscriptions, some of which we no longer use or need. Tools like Subpilot make it easy to see every active subscription across your accounts at a glance, so nothing keeps billing without your awareness. That's why it is important to understand how to cancel these subscriptions on Google Play!"

Why Cancel A Subscription On Google Play?  

Why Cancel A Subscription On Google Play? 

The decision to cancel a subscription on Google Play is not one we can take lightly. There are several valid reasons why you might want to drop a subscription. Understanding these reasons can help you make an informed choice about your digital expenses. By understanding the reasons why you might want to cancel a subscription, you can make more deliberate choices. These can be about the services you choose to subscribe to. Thus, you can ensure that your money is being used to enhance your digital experience.

Let us delve into the reasons behind why you might consider canceling a subscription on Google Play!

1. You No Longer Use It  

It's common to download an app or sign up for a service with the best intentions, only to find that you rarely use it after the initial excitement wears off. Life gets busy, and our interests change. That fitness app you subscribed to a few months ago now collects virtual dust on your phone. Simply because you've found other ways to stay active.  Perhaps you subscribed to a news app but have since switched to other sources for your daily headlines. In these cases, canceling the subscription frees up your digital and financial space for services you value and use.

2. Financial Reasons  

We all have to manage our finances, and sometimes subscriptions can accumulate to the point where they strain your budget. When you take a closer look at your bank statement, you might realize that you're paying for many subscriptions. Some of which you've forgotten about or no longer find valuable.  It's essential to focus on your spending. Canceling unused or less essential subscriptions can help you. How? Well, simply by redirecting your money to things that matter more.

3. Trial Period Ends  

Many apps and services offer enticing free trials to get you hooked. While these trials can be an excellent way to test a service, they often automatically convert into paid subscriptions once the trial period ends.

If you've tried out a subscription service during a free trial and found it's not what you were looking for, you'll want to cancel before it starts costing you. This prevents unexpected charges and ensures you're only paying for services you genuinely want.

4. You Got What You Needed  

Sometimes, you subscribe to access specific content or features, and once you've obtained what you need, continuing the subscription may no longer be necessary. For instance, you might have subscribed to a streaming service to binge-watch a particular series.

Once you've watched it, you've essentially achieved your goal, and there's no need to keep paying for the service. In such cases, canceling the subscription allows you to move on without ongoing costs.

Understanding Google Play Subscription Types  
Understanding Google Play Subscription Types

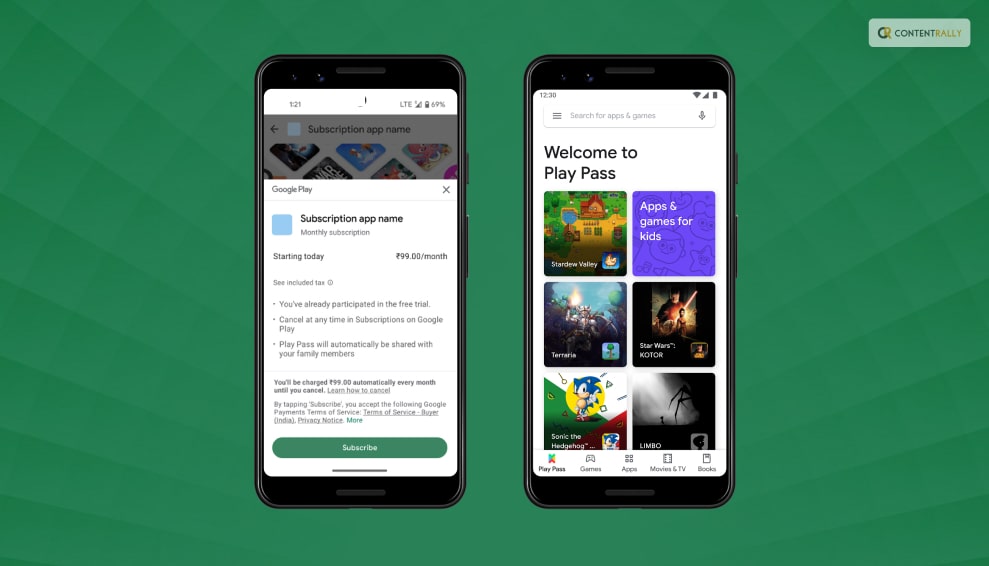
To effectively manage your subscriptions on Google Play, it's essential to grasp the two main subscription types offered: in-app subscriptions and Play Pass. Each type serves a unique purpose and is billed differently. Let me break them down to help you make informed decisions about your digital subscriptions.

1. In-App Subscriptions  

In-app subscriptions are the most common type of digital subscriptions on Google Play. They are subscriptions you buy through a specific app or service. Your Google Play account then bills these subscriptions. Examples of in-app subscriptions include streaming services like Netflix and music streaming platforms like Spotify Premium.

Here's what you need to know about in-app subscriptions:

  • App-Dependent: In-app subscriptions are entirely dependent on the app or service you're using. These subscriptions typically grant you access to premium features, content, or an ad-free experience within that specific app.
  • Billed Through Google Play: When you subscribe to a service through an app, the payment is processed via your Google Play account. This means that your subscription charges are consolidated, making it easier to manage multiple subscriptions in one place.

2. Play Pass  

Play Pass is a subscription service offered directly by Google. It provides subscribers with access to a curated selection of apps and games on the Google Play Store without ads or in-app purchases.

Some of the apps and games available through Play Pass include Stardew Valley, Monument Valley, AccuWeather, and Pocket Casts, among others.

Here are the key points to understand about Play Pass:

  • Google's Subscription Service: Play Pass is a subscription service provided by Google itself. Unlike in-app subscriptions, it's not tied to a specific app or service but rather grants access to a variety of apps and games.
  • Monthly Billing: Play Pass operates on a monthly billing cycle. You pay a fixed fee each month to access all the included apps and games. This fee is billed through your Google Play account.
  • Diverse Content: Play Pass offers a diverse range of content, including games, productivity apps, fitness apps, and more. It's an excellent choice if you want to explore various apps without ads or in-app purchases.
  • Free Trials: Google often offers free trial periods for Play Pass, allowing you to test it out before committing to a subscription.
  • Accessibility: Play Pass can be accessed by multiple family members, making it a cost-effective option for households with multiple Android devices.

Choosing The Right Subscription Type  

Understanding the difference between in-app subscriptions and Play Pass is crucial for effectively managing your digital subscriptions on Google Play. Each type caters to distinct preferences and needs, whether you're looking to enhance a specific app's functionality or explore a curated selection of ad-free apps and games.

The choice between in-app subscriptions and Play Pass depends on your specific needs and preferences:

  • In-App Subscriptions: Opt for in-app subscriptions if you're particularly fond of a specific app or service and want to unlock its premium features. This is the choice for personalized subscriptions tailored to your unique interests.
  • Play Pass: Consider Play Pass if you enjoy exploring a variety of apps and games and prefer an ad-free experience across multiple applications. It's an excellent choice for those looking for diverse content without additional costs.

How To Cancel A Google Play Subscription?  
How To Cancel A Google Play Subscription?  

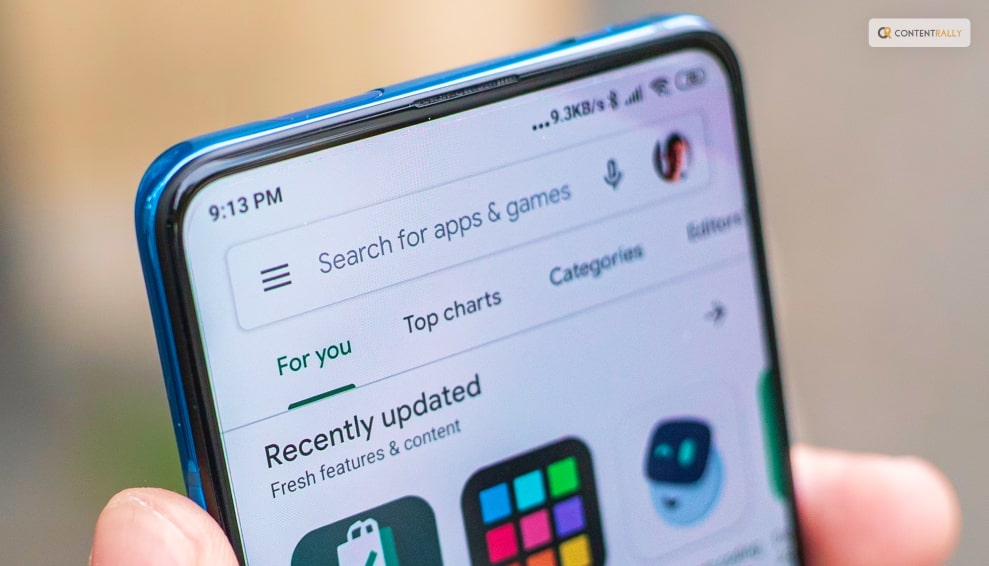
Managing your app subscriptions on Google Play is a crucial aspect of responsible digital spending. Whether you're looking to cut costs, declutter your digital life, or simply unsubscribe from a service you no longer use, understanding how to cancel your subscriptions is essential.

Here are some of the things that you can do to cancel your Google Play subscription:

Method 1: Using The Google Play Store App  
Method 1: Using The Google Play Store App

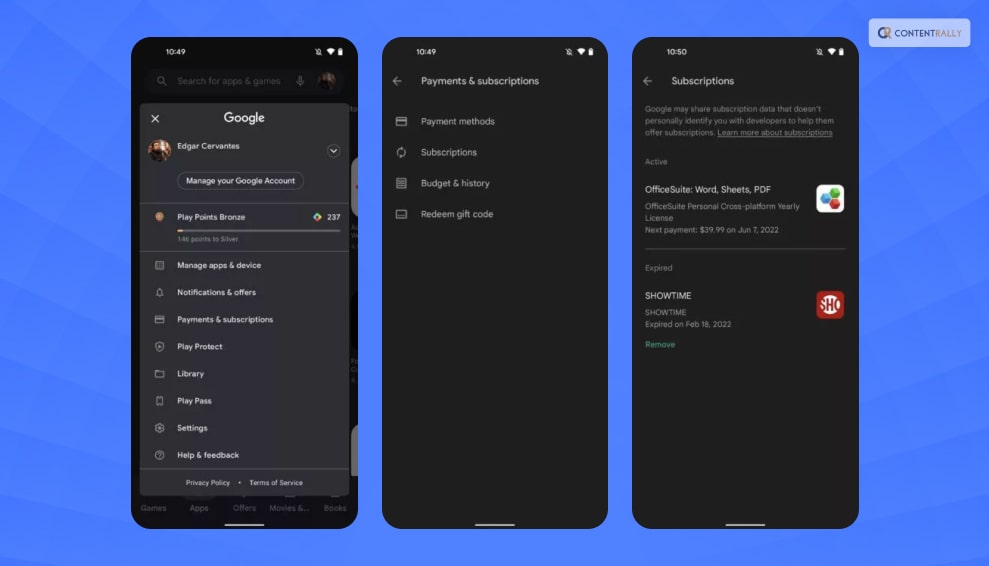
1. Open the Google Play Store: Begin by locating and tapping on the Google Play Store app icon on your Android device's home screen or in your app drawer. This opens the Google Play Store, your gateway to managing subscriptions.

2. Access Your Account: In the top-left corner of the Google Play Store app, you'll see three horizontal lines (often referred to as the "hamburger" menu). Tap on these lines to open a menu. Scroll down this menu until you find the "Subscriptions" option, and tap on it.

3. Select The Subscription: Inside the "Subscriptions" section, you'll see a list of all the subscriptions associated with your Google account. Browse through the list and locate the subscription you wish to cancel. Once you find it, tap on it to access its details.

4. Cancel Subscription: Within the subscription details, you'll see an option that says "Cancel subscription." Tap on this button to initiate the cancellation process.

5. Confirm: Google Play will prompt you to confirm your decision to cancel the subscription. Take a moment to review the details, including the date until which you'll have access to the service, and ensure it's the correct subscription. Once you're certain, tap "Cancel subscription" once more to confirm.

6. Done: Congratulations, your subscription is now canceled! You'll retain access to the service until the end of your current billing period, after which you won't be charged further.

Using the Google Play Store app to manage your subscriptions offers a user-friendly and convenient way to cancel subscriptions directly from your Android device. It's a quick process that puts you in control of your digital expenses, ensuring that you only pay for the services you genuinely need and want.

Method 2: Using The Google Play Website  
Using The Google Play Website

Using the Google Play website to manage your subscriptions offers the advantage of a larger screen and may be more convenient if you're already working on your computer. It's a simple and effective way to keep your digital expenses in check and ensure you're only paying for the services that truly matter to you.

Here's a step-by-step guide:

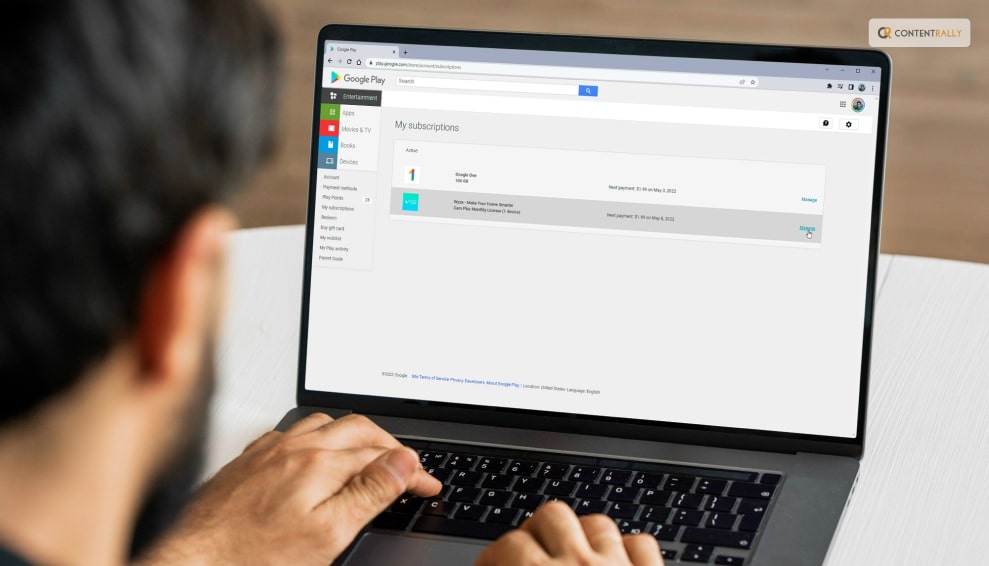
1. Visit The Google Play Website: Open your web browser and navigate to [play.google.com](https://play.google.com).

2. Login: Sign in to the Google account that is associated with the subscription you want to cancel. Make sure you're using the same account you used when you subscribed to the service.

3. Access Subscriptions: Once you're logged in, you'll see a menu on the left-hand side. Click on "Subscriptions." This will take you to a page that lists all your active subscriptions.

4. Choose The Subscription: Locate the subscription you wish to cancel from the list. It will display the app or service name, the renewal date, and the cost.

5. Cancel Subscription: Click on the "Manage" button next to the subscription you want to cancel. This will take you to the subscription details page.

6. Confirm Cancellation: On the subscription details page, you'll find information about the subscription and a "Cancel Subscription" option. Click on it.

7. Review And Confirm: Google Play will present you with the details of the cancellation, including when your access to the service will end. Carefully review this information. If you're sure you want to proceed, click "Cancel Subscription" once more to confirm.

8. Completion: Congratulations, you've successfully canceled your subscription using the Google Play website. You'll continue to have access to the service until the current billing period expires.

Managing Multiple Subscriptions  
Managing Multiple Subscriptions  

If you're juggling multiple subscriptions, staying organized is crucial. Here are some tips to help you manage them effectively:

1. Keep Track: Make a list of all your subscriptions, including the renewal dates and costs. Apps like "Truebill" or "Bobby" can assist in tracking your subscriptions.

2. Prioritize: Review your list and determine which subscriptions are essential and which can be canceled.

3. Set Reminders: Use calendar reminders or apps to notify you a few days before a subscription renews. This gives you time to decide whether to keep or cancel it.

4. Bundle Or Share: Some services offer family or group plans. Consider sharing costs with friends or family members to reduce expenses.

5. Be Vigilant: Periodically review your bank or credit card statements to ensure you're not being charged for subscriptions you canceled.

Troubleshooting Common Issues  

Troubleshooting Common Issues  

While canceling subscriptions on Google Play is usually straightforward, you might encounter some issues. Here's how to address a few common ones:

1. Forgotten Account: If you can't remember which Google account you used for the subscription, check your email for billing receipts. This will often show the associated account.

2. No "Cancel" Option: If you don't see the "Cancel subscription" option, it might mean the subscription isn't billed through Google Play. Contact the app's support for assistance.

3. Refund Requests: If you believe you were charged for a subscription you canceled, contact Google Play support within 48 hours. They can investigate and possibly issue a refund.

Wrapping It Up!  

So, go ahead and take charge of your subscriptions. Cancel what you no longer need, enjoy the services you love, and keep your tech life in balance. Your wallet will thank you, and you'll have a newfound sense of control over your digital world.

In case you were searching for ways to cancel your subscription to Google Play, I hope that this blog has been of help to you. If there are any other queries related to the same, feel free to let me know. All that you need to do is scroll down till you reach the bottom of the page. Then leave your comments and queries in the box below. And I will be there to answer them all for you!

keep Reading About:
Ankita Tripathy loves to write about food and the Hallyu Wave in particular. During her free time, she enjoys looking at the sky or reading books while sipping a cup of hot coffee. Her favourite niches are food, music, lifestyle, travel, and Korean Pop music and drama.

View all posts

Leave a Reply

Your email address will not be published. Required fields are marked *

Related

Google Meet Code

Google Meet Code 101: Learn All About The Platform’s Meeting Code

Google Meet is a popular video calling platform created by Google. Whether you are an individual or you are a business, you can connect with others on audio calls and video calls through the platform. Currently, Google Meet is mostly used for video conferences among friends, colleagues, or professionals. One person creates a meeting and sends a unique Google Meet code to others as an invitation to join. In this article, you will learn about the Google Meet platform and the utility of the Google Meet codes that are offered through a Google Meet invitation. Furthermore, you will also learn how the Google Meeting code works on the platform. Finally, you will find out how to join a meeting on Google Meet with the help of a meeting code. Hence, to learn more about the Google Meet code, read on through to the end of the article. What Is Google Meet?   Larry Page and Sergey Brin launched Google in 1998 as a search engine. Since then, in twenty-five years, Google covered a lot of milestones, as it is now offering platforms for advertising, cloud computing, quantum computing, computer software, social media, eCommerce, and many more. Google created the Google Meet platform for video calling and video conferencing. Both individuals and businesses commonly use Meet for video conferences, meetings, and discussions. Although created as an extension of Google Hangouts, which is a messaging platform, Meet comes with its own sets of unique features. To log in to Google Meet, one needs to have a Google Account. Your Google account is the same as your Gmail. You need the same during Google Hangouts login as well. Google Meet is also known for enabling users to engage in secure conversations. Although Google sucks in certain cases when it comes to innovation, Google Meet is surely something that stands out. It is one of the most trusted platforms for holding video conferences. Even some of the biggest companies hold big video conferences through Google Meet. What Does The Google Meet Code Mean?   According to Google Meet’s official sources, “Meet uses the same protections that Google uses to secure your information and safeguard your privacy. Meet video conferences are encrypted in transit, and our array of safety measures are continuously updated for added protection.” This is where the Google Meet code comes to play. Once you create a meeting on Google Meet, you will get a meet code, which you will need to share with the people you want to invite to the meeting. The Meet code and the Google Meet link are encrypted and hence provide essential protection for security. Basically, Google Meet codes act as meeting identifiers, which users use to invite and interact at meetings in which they are called upon. Every single meeting that took place on Google Meet, and all the meetings that will take place in the future, have a unique meeting code. This is done to offer security to the meeting so that someone does not get unauthorized access. How Does The Google Meet Code Work?   If you observe the different Meet codes carefully, you will see that all of them are of ten letters that are divided into three parts in 3-4-3 order of the type xxx-yyyy-zzz. The dashes are given for ease of reading. While you enter a code on a Google Meet link, you will not need to enter the dashes, as Google Meet supports only codes of 10 characters. The link will look like this: https://meet.google.com/xxx-yyyy-zzz. Once you click on the link that you received as an invitation on your device, you will get to a page where you will need to enter the unique code. After you enter the Meet code of ten-letter, you will get access to view and interact with the meeting. However, you will get to the meeting only after the host approves of your joining and participation. After you get inside the meeting, you will find the Google meeting code at the bottom-left portion of the screen. To allow others to participate, you can share this code with others. Does Google Meet Have A Time Limit?   Yes. Google Meet codes have a time limit. You cannot enter a meeting link with a meeting code after the code has expired. As per the claims of the official website of Google Meet, “Each meeting is given a unique meeting code which has an expiration time based on what Workspace product the meeting is created from.” To know more about the time limit of the Google Meet code, you can check Google Support. How To Join A Google Meet Conference?   The following are the major ways through which you can join a Google Meet conference: 1. Using A Computer Browser   Open the Google Meet website from your website browser, or type meet.google.com on the URL. Once you get to the Google Meet page, click on the ‘New Meeting’ option. If you want to join a meeting, click on the ‘Join with a code’ option, and enter the code. 2. Using Mobile App   Download the Google Meet mobile app on your smartphone. You need to launch the application and sign in to your account. On the page, you can either create a New Meeting and if you want to join an existing meeting, you need to click on 'Join with a code.' 3. Using Mobile Browser   Open a web browser app on your smartphone, and access the Google Meet website. Check the website as a desktop site. Otherwise, the link will ask you to download the app from Play Store. To create a meeting, tap on the New Meeting option, and click on ‘Join.’ Summing Up   Hope this article was helpful for you in getting a better idea of what the Google Meet code is and how to use it. This code is unique to every meeting and actually helps to secure the meeting from unauthorized access. You will get access to the meeting only when you enter this ten-letter code after clicking on the link. Do you think Google Meet is secure and useful enough? Share with us what steps Google can take to make Meet better. More Resources: Best Business Meeting Agenda Examples How To Plan A Successful Corporate Event Looking For A Gardener: 8 Questions To Ask Before Hiring A Professional

READ MOREDetails
On The Display Network, Your Ad Is Eligible To Show On A Webpage If Your:

On The Display Network, Your Ad Is Eligible To Show On A Webpage If Your:

Q1. On The Display Network, Your Ad Is Eligible To Show On A Webpage If Your: The correct answer to the question is “Keywords that match Webpage’s Content” On The Display Network, Your Ad Is Eligible To Show On A Webpage If Your - Detailed Explanation To The Question Now that you know the right answer to “on the display network, your ad is eligible to show on a webpage if your:” I hope now you are eager to know why we have chosen “Keywords Match That Webpage’s Content” as the correct answer! Basically, the display campaign ads will show on a webpage once your keywords match the webpage content. Okay, how do you think the Google ads get ranked? It is because Google’s algorithm is capable of analyzing the content of your webpage and denotes the main theme based on the keywords. If it matches your ad, then Bingo!, nothing can stop your ad from getting visibility. There are several factors based on which the compatibility of your ad is tracked. Examples include language, keywords, topic, latest browsing history of a visitor, location targeting, etc. In essence, this type of target ad is called “ Contextual targeting. ”  What Is Contextual Targeting? Understanding the details of contextual targeting would help you get more relevancy to the question “on the display network, your ad is eligible to show on a webpage if your: ” In simple terms, Contextual targeting is a type of personalized advertising that helps pay-per-click ads to display on related sites. Wanna get started with contextual targeting? Input topics or keywords and your campaign will be all set to appear on Display Network. This procedure kickstarts with adding content topics or keywords to the ad groups in your Display Network Campaigns. Google’s system automatically evaluates each content considering link structure, page structure, text, etc. What To Do To Build A Contextually Targeted Campaign? Keyword Contextual Targeting is actually the procedure of making the automatic placements (keyword-targeted ads) the same as to the Display network sites. Pondering over how to create a contextual targeted campaign? Check out the guidelines of Google in the below section: 1. Optimize Optimization is mandatory in contextually targeted campaigns. For instance, you can keep monitoring the Networks tab and eliminate weak matches. Furthermore, focus on including or deleting keywords, adjusting bidding, and pausing optimized ad groups.   2. Generate Keywords The contextually targeted campaign is all about keywords. Hence, keyword generation forms a crucial part here. Ensure that each group has 5-50 unique pieces keywords contextual to the theme of the ad groups.  3. Define The Ad Groups Make sure that every ad group has particular descriptive themes to explain more about the services or product. Also, you can add branded keywords in keyword-targeted ad groups. 4. Conversion Tracking Implementing conversion tracking is another way to analyze how your campaign is performing. Want in-depth insights about conversion data (site-level)? Then set up Google Ads Conversion Tracking.  5.  Set Bids For Ad Groups Here comes another most crucial requirement for building a contextually targeted campaign- setting ad group bids. To do this, fix the search bid to the prior display network bid at the same level.  ➤ One pro tip - Add Negative Keywords: This might sound astonishing, but adding negative keywords will refrain your ads from appearing on extraneous searches. In this way, the relevancy of the ads will sustain on display network sites.  So on the display network, your ad is eligible to show on a webpage if your keywords match webpage content - It’s justified! Frequently Asked Questions (FAQ) Q1. What Is The Correct Answer? - On The Display Network, Your Ad Is Eligible To Show On A Webpage If Your: On the display network, your ad is eligible to show on a webpage if your keywords match that webpage’s content Q2. What Is An Example Of Contextual Targeting? Contextual targeting facilitates an advertiser in displaying the right ads to the right context. For instance, if an ice cream parlor publishes an ad on a website about Waffle ice cream, it will be a contextual targeting.  Q3. How Effective Is Contextual Targeting? Contextual targeting is all about personalization for users. Eventually, it gives a redefined edge of profitability to the business.  The Bottom Line To conclude, contextual targeting is the main funda in making ads relevant to the Display Network sites. Only upon following it, your ad will be eligible to be displayed on the webpage. Now you know the answer to “ on the display network, your ad is eligible to show on a webpage if your: ” Why don’t you take the next step and apply it on your own business? You will simply rock in terms of visibility and conversions. Did you find this guide informative? Let us know your opinion in the comment area below. We will be pleased to hear your valuable viewpoints. Read Also: Two SEO Trends to Take Advantage of In 2022 Content Optimization: What It Is and How To Do It Things to consider while doing SEO What Do Ad-in And Ad-out Mean In Tennis?

READ MOREDetails
How To Delete A Page In Google Docs

How To Delete A Page In Google Docs

Google docs is a trendy choice for writing documents, articles, blogs, and other word processing types. However, the accessibility of the service is what made it most popular among people of every age group.  All thanks to Google for developing such a user-friendly writing platform. It is effortless to pick up, open, write and edit documents. The best thing about using Google docs is its flexibility. Needless to mention that it permits you to type words any time at any place.  However, there are certain features that you need to be aware of before you jump on to writing in Google Docs. One such part is deleting a page. Hence, it is crucial to know how to delete a page in google docs for writing without hassle.  The present guide aims to explain how to delete a page in google docs in different ways.  Benefits Of Using Google Docs Google Docs is a product offered by Google as a substitute for Microsoft Word. You can write on a doc file even when your device is detached from an internet connection. Most importantly, it does not charge a single penny from the users, unlike Microsoft Word’s latest versions.  Here are some merits of Google docs that are must rea before knowing how to delete a page in google docs: 1. Different Features Google Docs has identical features as MS Word. However, not everything is similar between these two programs. Google rarely incorporates new features to Docs. For example, 2014’s Suggested Edits was an innovative addition. It was an alternative to the Track Changes feature in MS Word. 2. Internet Connectivity If you have never seen magic ever in your life, you will see some in Google Docs. For instance, facing internet connectivity issues while writing is prevalent. In such a situation, you can write on docs smoothly without the same.  Actually, unlike Microsoft Word, Google docs operate in a web browser. Owing to this, even if your internet connection is unstable, you can get offline access to all the doc files. 3. Suite Integration Just like Microsoft Word offers integration with other Microsoft Office Suite, docs support supports identical collaboration. But did you know that Google Docs has tie-ups with other Google office programs? It mainly includes sheets and slides. Isn’t it amazing? 4. Google Drive Integration It is the unique part of Google Docs and one of the main reasons behind its larger number of users. Whenever you create and save a Google Doc with its name, it automatically saves your file in associated Google Drive.  Therefore, if the system shuts down while writing, don’t panic; the doc is already saved in your drive. Furthermore, you can link your docs with any other cloud storage service freely. Thus, it is crucial to know apart from how to delete a page in google docs. You can also read- Why I Can’t Download From Google Drive? How To Fix It? 5. Link to Grammarly.com A great advantage that Google docs provide is its linkage to Grammarly. So if it is a professional report or academic essay, you just need to run an in-depth grammar check.  Till now, you knew that both Microsoft Word and Google docs have inbuilt grammar checking tools. Although, there is something more than this in Google Docs. The doc where you are writing is accessible to the Grammarly website.  To enjoy this innovative trait of Google Docs, sign in to your Grammarly account. Then add it as an extension to the Docs website, and there you go. The grammatical errors will be automatically detected as you write.  Top Ways To Delete An Unwanted Page in Google Docs We hope that you have gained a clear idea of the functionality of Google Docs by now. Hence, let us concentrate on the purpose of the article- how to delete a page in google docs: Option 1: Simply Hit The Delete Option It is the simplest and most common way to delete a page from Google Docs, although many users are unaware of it. So before trying anything more complicated, try this step. Just place your cursor at the end of the written text on the previous page and press Delete.  Most of the time, you can make it work without any other challenge. Nonetheless, several users across the globe do not know how to remove a page in google docs just because of insufficient knowledge.  Option 2: Remove Page Break Another thing that you may have overlooked despite using Google Docs is to remove a page break in it. While writing with utmost concentration, sometimes you insert a page break in the document unknowingly. What happens as a result of this is the addition of a new page below.  This is quite natural, and there is nothing to be concerned about this. Every other person has come across this problem. Indeed, you can try deleting it, but that would not be as much effective as omitting a page break will be.  Option 3: Use Custom Spacing Once you are familiar with using the Delete button, you can try being a little advanced. First, navigate to the Format menu and click Line Spacing. Following this, hit the Custom spacing option. The main focus here is the spacing between two paragraphs.  If you select the spacing of 1.5 or 2.5, it might lead to the generation of unwanted pages. In addition, it will make your document look lengthy. If you want to avoid this, follow the procedures above and delete pages.  Decrease the value to 0 and check whether the extra page at the end has been deleted. Knowing how to remove a page in google docs is equally essential to understand how to add a page on google docs. Option 4: Adjust Or Remove Google Docs Margin Last but not least, you can solve the issue by adjusting margins sometimes. For example, Google docs often attempt to insert huge margins at the bottom. As a result, it reduces the content area and increases the number of extra pages.  In order to eliminate or remove the Google docs margin, go to File and then Page Setup.  Shrinking down the margins will allow you to return to the correct number of pages you want in your file. If you are writing an essay or a news article, this procedure is exceptionally efficacious. It will make your content file short and crisp.  The Final Thoughts  To conclude, writing efficiently on Google docs is pretty straightforward. But you need to have clear concepts regarding its multidimensional features. From the guide above, it is evident that Google docs have some distinctive characteristics.  How to delete a page in google docs? - We have chosen this question as it is more frequent among new users. Nevertheless, you must grasp its full usabilities to avoid unwanted disturbances while creating an important document.  Deleting a page in a doc is a point that you may frequently need while processing words. Hence, be accustomed to not only one hack but also several tricks to serve this purpose quickly.   Follow us for more engaging and helpful articles like ‘how to remove the page break in google sheets,’ etc. More Resources How to Create an Effective FAQ Page for Your Website Good Literacy is Good Literacy: Improving Reading and Writing Is Big Data Capable Of Predicting The Next Best-Selling Book And Author: An Analysis

READ MOREDetails