Googling How to Fix a Blown Head Gasket? Find Out Here

Published on: 03 February 2022 Last Updated on: 07 February 2025
Blown Head Gasket

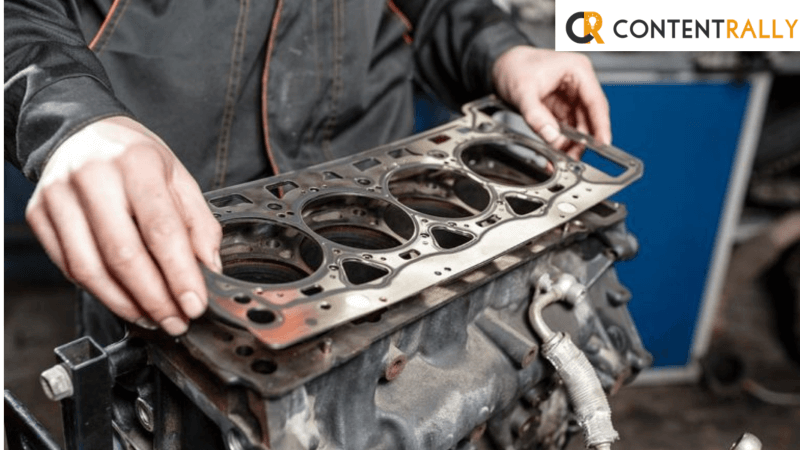
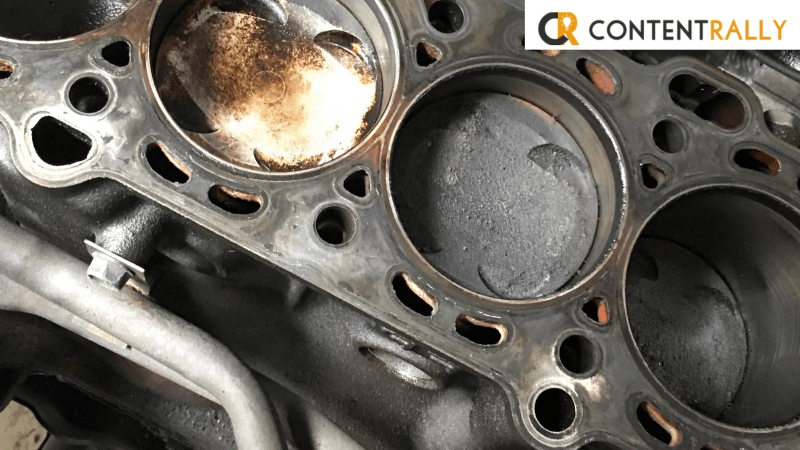
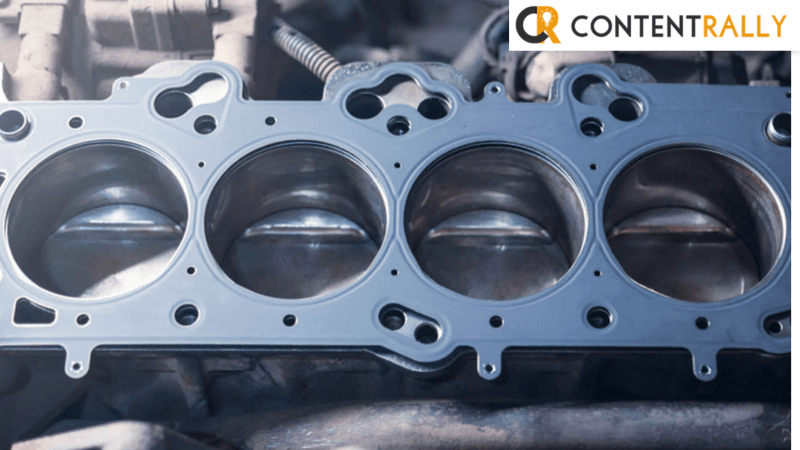
Nothing can be more frustrating than a blown head gasket in your vehicle. The worst nightmare is if you cannot access a mechanic to fix it for you. You have only one option left in that situation; do it yourself. You may consider several options to fix the problem, but the ideal solution will be a steel solution to solve the problem permanently.

The steel seal solution is a combination of various chemicals that react under given conditions to form a permanent seal to the crack that is causing leakage in the engine. Therefore, if you were wondering how to fix a blown gasket, find out here how to use a steel seal solution for that purpose.

Remove the Radiator Cap

Remove the Radiator Cap

When learning how to fix a blown head gasket, please remember not to start the engine if the coolant is not in place. You need to ensure that the engine radiator is cold before removing the cap. Carefully pour the clear steel seal solution into the radiator. If you unload the coolant, put the sealant into the system, then follow with the coolant.

Start the Engine

Switch on the fan and heater and turn them to the maximum. Start the engine and run up to maximum operating temperature. On reaching operating temperature, run the engine for thirty more minutes.

It may take approximately half an hour, though the time depends on the automotive’s condition. If your vehicle is roadworthy, you can drive on a freeway for up to five miles at 3000 to 4000 RPM.

After that, cut the engine and let it cool down. Refill with antifreeze or water, then secure the radiator cap.

Drive the Vehicle as Usual

After finishing the second step, your vehicle is suitable for the road. Let the steel seal fix in the system and start your ride usually.

However, if you use an expansion tank to put the steel seal, please be careful that the sealant does not remain in the tank reservoir. Ensure there is enough space for the solution to go inside the cooling system. If you complete the treatment with only water, please replace the coolant once you finish the repair before driving.

Further Instructions on Steel Seal

It is possible to try various substandard products to fix a blown head gasket. If this happens, please use clean water to flush the cooling system once you remove the radiator hose at the bottom. Nb, avoid using a flushing agent.

Directions for Backpressure

Directions for Backpressure

Some vehicles have a lot of back pressure building up in the cooling system. Read more here on fixing a blown head gasket if you are facing the backpressure problem.

  • Find the cylinder producing the bubbling in the spillage tank or backpressure. You can achieve this by removing one plug after another until the bubbling subsides.
  • Remove the injector from the cylinder with the bubbling in the backpressure before you start to drive. That is to limit the volume of unburnt fuel flowing to the combustion chamber.

To Sum It Up

Trying to fix a blown head gasket can be a nightmare if you lack the necessary knowledge. It can drain your money and time to look for an expert. However, steel seal fix is your number one DIY solution. This step-by-step guide will help you do your head gasket repair yourself.

Read Also:

Content Rally wrapped around an online publication where you can publish your own intellectuals. It is a publishing platform designed to make great stories by content creators. This is your era, your place to be online. So come forward share your views, thoughts and ideas via Content Rally.

View all posts

Leave a Reply

Your email address will not be published. Required fields are marked *

Related

Camera Inspection

What Can A Professional Sewer Line Camera Inspection Do For You?

Sewer cameras are heaven-sent for plumbers. As the name implies, the device helps plumbers inspect hard-to-reach plumbing lines underground without needing to dig. It is a simple contraption consisting of a long, snake-like rod with a miniature camera attached to the end. The slinky design allows plumbers to navigate the camera into the pipes and lets them see if there's damage or leaks in the pipelines without going underground themselves. What Is Involved in a Sewer Camera Inspection?   In the days of yore, inspecting a sewage system was no easy feat. Plumbers would have to get dirty and go underground themselves just to check if there's anything amiss in the system. Sometimes, plumbers would have to do this several times to ensure they covered everything. With the development of sewer cameras, sewage system inspections are done much more efficiently and conveniently. A sewer camera inspection can quickly identify any problems in your sewer pipes, eliminating any guesswork and allowing plumbers to identify and resolve minor plumbing problems before they worsen. Types of Sewer Cameras There are currently two types of sewer cameras, and both are listed below.  1. Reel-Based   This camera is equipped with a large-sized cable reel. Plumbers often use it when they inspect sewer and long drain pipes. The cable can be connected to a video recorder or a laptop through which the required pipe images are relayed.  2. Hand-Held     This sewer inspection camera is well-known for its portability. It is commonly used to check blocked drains in residential areas. Plumbers typically have this camera in their hands while they perform a sewage inspection. Since it is lightweight, plumbers can easily bring this camera around while they work. Benefits of Using a Sewer Camera A Denver plumbing expert said a sewer camera inspection is the best way to find out what is happening beneath your house. Specifically, this modern plumbing device offers the following:  1. Timely Repair It is better to prevent plumbing issues than allow them to worsen and cause costly repairs later. A sewer camera inspection can help you achieve this. It can even be expanded so old plumbing fixtures can be included, and hidden issues can be detected. 2. Soil Assessment One common problem in any plumbing system is a broken or leaking sewer line, which could be due to soil movement, as it can cause pipes to move and crack. A sewer camera inspection can help you determine this and fix the problem in no time. 3. Quick and Accurate Diagnostics   Sewer cameras relay the images back to the overground monitor in real time. It means it will be a lot quicker than traditional inspection methods, where a plumber would have to get down literally and dirty. Diagnostic mistakes are also cut down to a minimum because plumbers can check several times just to make sure they have made the correct findings. 4. Lawn Protection     Before sewer cameras, the only way to locate a crack in your water pipes was to dig a large hole through your lawn. Digging can cause damage to your grass, shrubs, plants, and trees. As mentioned earlier, sewer cameras require no digging. This saves you money and time, but more importantly, you get to keep the beauty of your lawn. 5. Quick Clog Identification The typical sewer camera can detect all kinds of blockages and identify the source. If the clog cannot be found in the drain area, it is usually located in a deeper part of the pipelines. Sewer cameras make it easier and faster for plumbers to locate the problem, even if it's deeper underground. 6. No Permits Previously, plumbers had to secure a permit before they could dig in your yard. These days, they can just use the sewer camera to see right through your pipes and identify the problem. 7. Better Property Appraisal     A plumbing inspection is not necessary to determine a property's value. However, it can help you better understand its true worth. Sewer camera inspections can help you identify potential plumbing problems and make any necessary repairs. A property with no plumbing problems can attract more potential buyers and increase the market value of your property. 8. Retrieve Lost Valuables Although this can be considered a bonus, a sewer camera can locate valuables, such as an earring or a necklace that was accidentally flushed down the drain. If the plumber finds anything of value in your pipelines during an inspection, you can ask them to retrieve the item for you. 9. Future Problem Prevention   Old plumbing pipes can cause irreparable damage to your walls and even your basement. This often remains unnoticeable until it is too late. A plumbing camera can perform a quick inspection of your home, identify a problem, and you can have it fixed before it becomes serious. Key Takeaway   Modern technology has enabled man to create many advanced equipment and devices. The sewer camera is a prime example since it has become invaluable in the plumbing industry, making underground sewage inspections much faster and easier. A broken underground pipe that could only be reached through a dug hole in your yard can now be analyzed through a remote monitor. This allows for a faster and better resolution of many plumbing problems and inspires many homeowners to contact a plumber when they need help with their plumbing. Additional: Thermal Mass Flow Meter – What To Know? Is Steel/Iron Ore A Good Career Path In 2021? Best Paying Jobs In Industrial Machinery/Components Tired Of Seeing Your Old House? Here’s What You Need To Know

READ MOREDetails
audio renderer error

How To Fix Audio Renderer Error In Windows 10

Are you getting an “audio renderer error, please restart your computer” error message in your Windows 10 system? In case you still have not restarted your computer, then you can start by clearing your browser cache. And then restart your computer. If the audio renderer error on YouTube still persists, there are several other tactics or troubleshooting steps that you can try to eliminate this issue. Causes Of Audio Renderer Errors Here are different reasons why you might face audio renderer Errors – Driver Issues One of the reasons why you face audio renderer errors is because the driver is getting corrupted or outdated. When the drivers aren’t working properly, it can cause communication errors Between the hardware and the operating system. Most users report that updating the drivers or rolling them back often resolves the issue. Hardware Conflicts Hardware complex can also cause the audio devices to Trigger these errors. Got example would be when a computer has both the headphones and the speakers connected. This can cause a struggle within the computer to determine which device should deliver the output. In this case, it's best to disconnect one of the devices. Software Conflicts The software conflicts in the computer can also interfere with the audio playback. This happens when the web computer has installed different extensions or third-party audio and has enhancement tools. Sometimes, the system updates also in advertently affect the audio setting, causing conflict within the software and audio rendering processes. Updating Windows Operating System Sometimes, updating the Windows operating system can also disturb the existing audio on the favorite configuration, leading to audio issues. In many cases, it's best to check if the audio is working after major operating system updates. Corrupted Systems Corrupted system files can also lead to audio-rendered errors. It's best to run system file checks for or troubleshoot utilities to identify and solve these issues. Fixing Audio Renderer Error In Windows 10 Here are the ways to techniques that will help you fix the YouTube audio renderer error in Windows 10. If you are getting no sound on YouTube Windows 10, you should definitely try these steps and check whether the issue is solved or staying. 1. Replug Or Unplug The Sound Device In case you have any external wired audio device connected with your system, like a pair of earphones, headphones, or speakers, then unplug the device and start the youtube video. If the audio is playing, then connect the device again and check for the issue. Sometimes, when you connect too many external devices to your computer, this audio renderer error may occur. At that time, connect only the default audio device and disconnect the rest to solve the issue. If this error is still showing, try the next suggestion. 2. Close The Audio Mixing programs Audio mixing programs, like Mixcraft, often take exclusive control of your system’s audio drivers and prevent your browser from using them. In case you have a program like this, and it is running in the background before you start watching Youtube, completely exit the program. On the other hand, you also can prevent those programs from taking control of your audio devices. For example, let’s go through the steps for Mixcraft. Open File. Go to Preferences. Go to Sound Device. Search for Exclusive Mode. Now, uncheck the box or turn off the switch. 3. Disable And Enable Sound Devices While trying to fic audio renderer error in Windows 10, you can disable and then again enable sound devices to fix the issue. Here are the steps to do that.  Right-click on the Start Button. Now select the Device Manager. Expand the option Audio inputs and outputs. Now, right-click on your default audio device name. Suppose you are unable to figure out where to click, as there are a lot of options. Right-click on the volume icon. Choose Disable device. Select the Yes option to confirm. Again, right-click the Audio device. Now, Enable the device. 4. Run The Audio Troubleshooter Now you have done with the three fixing techniques, but the audio renderer error is still there. You can try to fix the issue by using the audio troubleshooter in your Windows 10 system. It will not only be able to detect the underlying problems but also help to fix the issue. Follow the below steps to do that. Open the Start menu. Now, type troubleshoot settings. Now select Open. Select the option named Additional Troubleshooters. Select Playing Audio. Now select Run the troubleshooter. Now follow the on-screen suggestions or instructions to solve the issue of the YouTube sound cutting out. 5. Rollback Audio Drivers Are you facing the audio renderer error just after updating any sound card or audio playback device-related driver? If yes, then try rolling them back. But in case there is no update, you can not try to roll back them. Audio Playback Device Right-click the Start button. Select Device Manager. Expand the option Audio inputs and outputs. Now, right-click on your default audio device name. Choose Properties. Switch to the tab named Driver. Now select Roll Back Driver. Audio Card Drivers Open the Device Manager. Expand the options for Sound, videos, and game controllers. Right-click on the Audio card driver. Now select Properties. Switch to the tab named Driver. Then Select Roll Back Driver. In case you are multiple audio drivers, repeat steps 2 to 4. 6. Update Audio Drivers What if you can not rollback your audio drivers to fix the audio renderer error issue? You can try updating them instead. Audio Playback Device Right-click the Start button. Select Device Manager. Expand the option Audio inputs and outputs. Right-click on the default output device. Choose the Update driver. Select the option named Search automatically for drivers. Now apply the last driver updates if you get the option. Audio Card Drivers Open Device Manager. Expand the option Sound, videos and game controllers. Right-click on the Sound card driver. Select the Update Driver. In case you see multiple devices, repeat the third and fourth steps.  7. Update Windows 10 An outdated system often becomes the reason for many technical glitches and abnormalities to crop up. Updating your Windows 10 may eliminate the audio renderer error. So, update it now. Open the Start menu. Now type there Windows Update. Hit Enter. Now select Check for updates. If any update is available, install it. Just below the Check for Updates option, there will be another option named Optional Updates. Select it in order to install any updates related to audio. Update Web Browser An outdated web browser can also be the main reason behind audio renderer errors. Though popular web browsers such as Firefox and Chrome are designed for automatic updates, there is no harm in double-checking. And if there is, any update is available. Install it. 8. Disable Hardware Acceleration Hardware acceleration is used by your browser in order to speed up things. But this feature also can cause audio renderer errors in Windows 10. So, you can disable hardware acceleration to avoid this issue. Google Chrome Open the Chrome menu. Select Settings. Expand Advanced. Choose System. Search for Use hardware acceleration when available. Turn the switch off. Mozilla Firefox Open the Firefox menu. Select Settings. Scroll the General tab down. Search for the Performance section. Search for Use hardware acceleration when available. Uncheck the box. Final Tips All the tactics that are mentioned above are more than enough to solve the audio renderer error in Windows 10. But if it persists, you also can update the bios and check whether the issue is solved or not. If you have any other technique to solve this issue, you can share that with our readers. Read Also: How Many Jobs Are Available In Real Estate Investment Trusts? 2021 How to Download Game Of Thrones Putlocker Online for Free? How to Plant Grass Seed on Hard Dirt? – Latest Update 2021  

READ MOREDetails
SaaS Products

Offering SaaS Product: Subscription or One-Time Purchase?

When starting a new SaaS business, one of the first decisions you have to make is how to price your product. Should you offer it as a one-time purchase, or should you make it a subscription? Both options have pros and cons, and deciding which is right for your business can be challenging. In this article, we will discuss the benefits of each pricing model and help you decide which is best for you. Benefits Of SaaS Subscriptions SaaS, or software as a service, is a subscription software such as AWS Marketplace SaaS integration that allows users to access and use the software from a remote location. SaaS has many benefits, including the ability to scale quickly, pay-as-you-go pricing, and increased flexibility. For businesses, the scalability of SaaS can be a significant advantage. Since businesses only need to pay for the number of users, they can easily add or remove users as required, which can help companies to save money and avoid hiring new staff to manage the software. Pay-as-you-go pricing also appeals to businesses because it allows them to control costs. With SaaS, businesses only need to pay for what they use, which can help them save money on IT expenses. Employees can work from home or on the go without missing a beat. SaaS is an attractive option for businesses of all sizes due to its many benefits. The Benefits Of One-Time Purchases There are several benefits to purchasing a SaaS product outright instead of signing up for a subscription. For one thing, it can save you money in the long run. Subscription fees can add up over time, and you may be able to get a discount by buying the product outright. Additionally, one-time purchases give you more control over when and how you use the product. With a subscription, you may be locked into using the product for a certain period, even if you're not getting as much value out of it as you'd like. Finally, one-time purchases can simplify your financial life by eliminating the need to keep track of another monthly bill. When it comes to SaaS products, there are several advantages to making a one-time purchase instead of signing up for a subscription. Which Option Is Best For Your Business Consider a few things to consider when selling your SaaS product as a subscription, such as AWS Marketplace SaaS integration or one-time purchase. First, think about your target market and what kind of commitment they are willing to make. For example, if you are selling an enterprise-level software solution, the subscription might be the better option as businesses are generally more comfortable with recurring payments. On the other hand, if you are selling a more straightforward solution to consumers, they might prefer a one-time purchase. Another thing to consider is the type of product you are selling. A subscription model might work well for products that require frequent updates or must be constantly accessed to be used effectively. For example, online or cloud-based software would likely be better suited for a subscription model. On the other hand, products that can be downloaded and used offline are often more appropriate for a one-time purchase. Factors To Consider Once you've decided whether to offer your SaaS product as a subscription or a one-time purchase, there are a few factors to consider when choosing the suitable pricing model. First, consider your product's value and how much it would cost to replace it if lost or stolen. For products with a high replacement value, such as enterprise software, a subscription model might be best so that businesses can spread the cost of the product over time. On the other hand, for products with a lower replacement value, such as consumer software, a one-time purchase might be more appropriate. Another factor to consider is the length of time it takes to use your product effectively. If your product requires a lot of training or onboarding to be used effectively, a subscription model might be best so that customers can access the product for as long as they need. On the other hand, if your product is easy to use and doesn't require much setup, a one-time purchase might be more appropriate. Tips For Increasing Subscription Renewals Once you've decided on a pricing model, you can do a few things to increase subscription renewals and reduce churn rates. First, offer discounts for customers who commit to longer-term subscriptions. This will give them an incentive to stay with your product long-term. Additionally, make it easy for customers to cancel their subscriptions if they're not happy with the product. By making it easy to cancel, you'll show that you're confident in your product and not trying to trap people into a contract they don't want. Finally, keep your prices reasonable, so people feel like they're getting a good value for their money. Final Thoughts As you can see, there are a few things to consider when deciding whether to offer your SaaS product as a subscription or a one-time purchase. First, think about your target market and what kind of commitment they are willing to make. Second, consider the type of product you are selling and how it would be used. Finally, factor in the price of your product and how much people are willing to pay for it. Considering these factors, you can make the best decision for your business. Read Also: Steps For Salesforce Application DevelopmentIs Computer Software Prepackaged Software A Good Career Path?7 Ways A Software Development Company Can Help Mitigate Technology Risks In Business

READ MOREDetails