How To Cook Sausage That Tastes Like Heaven

Published on: 18 March 2021 Last Updated on: 27 December 2024
how to cook sausage

If you have been dreaming a lot about sausages lately, I am sure the thought of how to cook sausage has also struck your mind. Well, let me tell you that cooking this tasty, meaty delicacy does not require any top-notch skill. Check out own the grill for additional grilling strategies, guides, and tips on making the perfect grill recipes

To cook sausages perfectly, what one requires is patience. It has been found that people often face many challenges while cooking sausages. These issues can be that while the exterior of the sausages gets cooked, the insides remain raw. You can also StoneFryingPans for more info on cooking.

Also, the sausages might end up being dry, or the casings might split as well. However, I earnestly request you not to worry. Since I am here now, I will guide you to understand and learn every aspect of cooking perfect sausages. You can also visit how-to-boil.com for more information about the same.

What Is A Sausage?

What Is A Sausage?

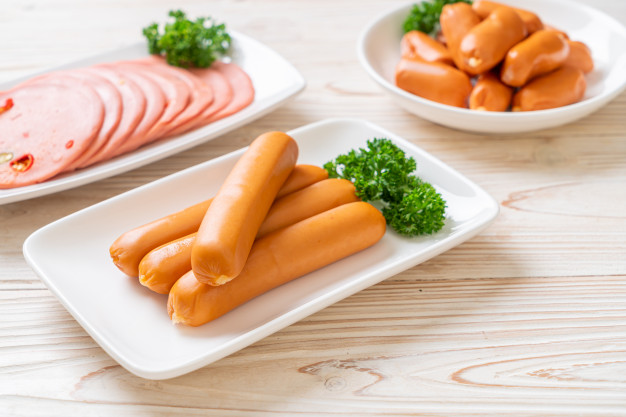
A sausage is a meat product, or to be more specific, a type of forcemeat. It is generally composed of ground meat, such as beef, pork, and even poultry. Some seasonings, herbs, and spices are also added for flavors. 

These forcemeats are then enclosed in a casing made of animal intestines or synthetic materials. A huge variety of sausages are available across the world that are native to the places where they are found. 

What Are The Different Types Of Sausage?

What Are The Different Types Of Sausage

There is a basic classification of sausages based on a lot of features. From the types of ingredients used to the various cooking procedures, all are taken into consideration while differentiating between sausages. 

It can be primarily classified as cooked, fresh, and dry sausages. Sausages also vary according to regional influences. American sausage, Italian sausage, German sausage, and many more sausages have been extremely popular around the world. 

Some of these are Cumberland sausage from the UK, Haggis from Scotland, Saucisson and Chipolata from France, Bratwurst sausage from Germany, Chorizo sausage from Spain, Mortadella sausage from Italy, and many more. 

Various Ways Of How To Cook Sausage

Various Ways Of How To Cook Sausage

The best way to cook sausage is to tailor it to the preferences of your taste buds. You would also find sausages that could be eaten raw like the Chorizo. However, most other sausages need to be cooked before consumption. 

Whether you want to know how to cook breakfast sausage or some Italian sausage, let me tell you that these can all be cooked in a similar way. Now, with the evolution of modern cookery, many recipes have been developed for cooking sausages. But, here we will focus on the basic methods of sausage cookery:

How To Boil Sausage?

Boiling a sausage is one of the easiest ways to learn how to cook the sausage. If you are thinking boiling a sausage is some very difficult task, then you are wrong. It is as simple and similar as boiling any other food item. 

Boiling a sausage will allow the hot water to pierce through the meat and cook the interior part more evenly. It will have a soft, tender texture rather than a crispy one. 

Ingredients Required:

  • Sausages 
  • Water
  • Salt

Procedure:

  • Take a saucepan and fill it with enough water.
  • Increase the heat and bring it to a boil. 
  • With the help of tongs, place the sausages in the saucepan. 
  • Reduce the heat and keep it on simmer. 
  • Add some salt to the water. 
  • For flavoring, you can opt to add some wine, beer, or stock.
  • Cover the pan with a lid.
  • Let the sausages cook for about 15-30 minutes, depending on the size. 
  • Remove the lid, take the sausages out and dry them with some paper towel. 

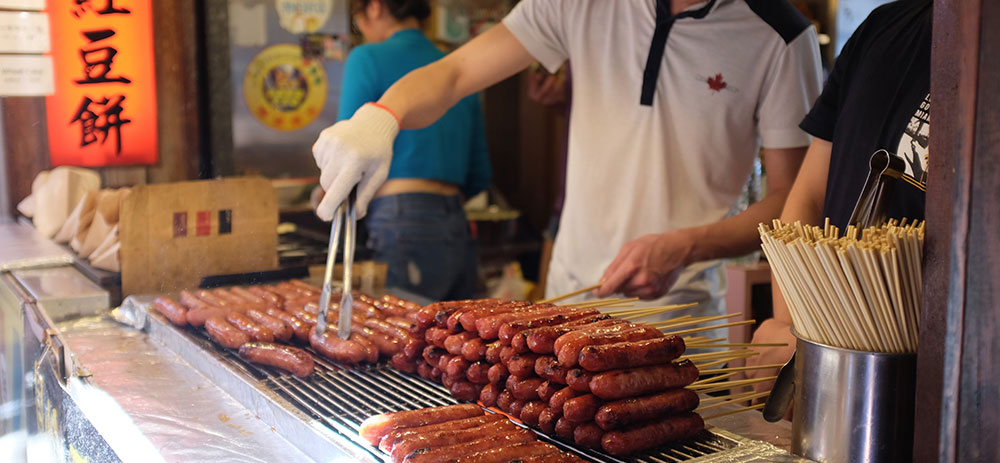
How To Grill Sausage?

Grilling is a form of high-temperature cooking that allows the food to get cooked by the application of dry heat. In this method of cooking, the heat might be applied from above, or below, or even from the sides. It is often stated by health professionals that grilling sausage might lead to the formation of potentially hazardous compounds in the food. 

However, nothing beats our love for sausages, so you might compromise on your health a bit this time. Grilling the sausages will eventually turn them brownish in color with grill marks on the body. 

Ingredients Required:

  • Sausages 
  • Oil
  • Salt and pepper 

Procedure:

  • For this cooking method, the most important thing that you need is a griller.
  • Make sure the temperature is higher on one side while lower on the other. 
  • As the griller gets heated, spill and spread a tablespoon of oil over it. 
  • Use tongs and place the sausage on the hotter side of the grill.
  • Grill them for a minute or two and cook on both sides to get the marks. 
  • As they acquire a deep-brownish color and start to burn, immediately move them to the cooler side of the grill using tongs. 
  • On this side, cook the sausages slowly for about 10-15 minutes. 
  • When they are done, remove from the grill and sprinkle some salt over.  

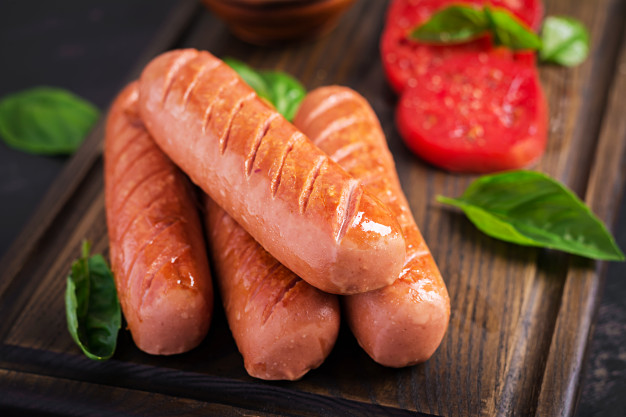
How To Bake Sausage?

Baking is a great way that can help you learn how to cook sausage in the oven. Baking is also a dry method of cooking that involves the application of high heat. This method makes the sausages taste more interesting than ever. 

There are also very few chances of the item getting burnt in an oven. Here, the heat is gradually distributed from the surface to the interiors of the food. A baked sausage often has a crispy texture and appears to be light-brownish in color. 

Ingredients Required:

  • Sausages 
  • Butter
  • Garlic
  • Salt and pepper
  • Fresh herbs
  • Cheese

Procedure:

  • Preheat the oven to 350°F.
  • While the oven is heating, take a baking tray and brush it with a very little amount of butter or oil. 
  • If you want to make it more delicious, you can brush some butter over the sausages and add some chopped garlic to them. 
  • Place the sausages evenly apart on the tray. 
  • Put the filled tray inside the oven. 
  • Let the sausages get cooked for about 30-40 minutes, depending on the size. 
  • You can turn the sausages once in between to get them evenly cooked.
  • Once they are cooked, take the sausages out.
  • Sprinkle some freshly chopped herbs and some grated cheese over the sausage. 

Final Thoughts

Well, I haven’t seen you cook yet, but I am certain that you have learned about the basics of how to cook sausage after reading this article. Aren’t these methods excessively simple? Yes, I knew you would agree with me. 

So when the love for sausage is there, and the grill is on fire, what on earth is stopping you? It is your time to relish such a delectable piece of food.

More Resources:

Content Rally wrapped around an online publication where you can publish your own intellectuals. It is a publishing platform designed to make great stories by content creators. This is your era, your place to be online. So come forward share your views, thoughts and ideas via Content Rally.

View all posts

Leave a Reply

Your email address will not be published. Required fields are marked *

Related

How to harvest potato

How to Harvest Potatoes: A Complete Guide from Planting to Storage 

If there is something that I have learned in life, it is about gardening. Well, almost everything if not all. And if there is one thing that took me some time to master, it was knowing how to harvest potatoes at home!  Potatoes are one of the most versatile and popular vegetables in the world. They can be cooked in many different ways, such as boiled, baked, fried, mashed, or roasted. Moreover, they are also rich in carbohydrates, fiber, vitamin C, potassium, and antioxidants. But how do you grow and harvest your own potatoes at home? You see, potatoes are not like cilantro or other plants. These are tubers.  In this article, I will show you everything you need to know about how to harvest potatoes, from planting to storage. So, if that is something that you are interested in knowing, then I have you covered! Keep on reading this blog till the end to learn more...  How to Plant Potato Seeds or Tubers?  The first step in how to harvest potatoes is to plant them. You can start with either potato seeds or tubers. Potato seeds are small, round, and black, and they are usually sold in packets. Potato tubers are the actual potatoes that you eat, and they have eyes or buds that can sprout new plants. You can buy certified seed potatoes from a nursery or garden center, or use organic potatoes from the grocery store.  Here are some if the steps that you must take to plant them:  Planting Potato Seeds  To plant potato seeds, you need to sow them indoors in pots or trays filled with moist potting soil. Place them in a sunny spot and keep the soil moist but not soggy. The seeds will germinate in about two weeks and produce small green shoots. When the shoots are about 3 inches tall, you can transplant them outdoors in your garden or in containers.  Planting Potato Tubers  To plant potato tubers, you need to cut them into pieces, each with at least one eye. You can do this a few days before planting to let the cut surfaces heal and prevent rotting. Alternatively, you can plant whole small potatoes with several eyes. To prepare the soil, you need to loosen it and add some organic matter, such as compost or manure.   You also need to make sure the soil is well-drained and slightly acidic, with a pH of 5.0 to 6.0. You can use a soil test kit to check the pH level and adjust it with lime or sulfur if needed.  Planting Potato Pieces  To plant the potato pieces, you need to dig a trench about 4 inches deep and 12 inches wide. Place the pieces about 12 inches apart, with the eyes facing up. Cover them with 3 inches of soil and water well. As the plants grow, you need to hill up the soil around them to cover the lower stems and prevent the tubers from being exposed to sunlight, which can turn them green and bitter. You can also mulch the soil with straw, leaves, or grass clippings to retain moisture and suppress weeds.  How to Care for Your Potato Plants?  The second step in how to harvest potatoes is to care for your potato plants. You need to water them regularly, especially during dry spells, to keep the soil moist but not waterlogged. You also need to fertilize them every two weeks with a balanced organic fertilizer, such as fish emulsion or seaweed extract. Also, you can add some wood ash or bone meal to provide extra potassium and phosphorus, which are essential for tuber formation.  You also need to protect your potato plants from pests and diseases, which can reduce your yield and quality. Some of the common potato pests are:  Colorado potato beetles, which are yellow and black striped insects that feed on the leaves and can defoliate the plants. You can handpick them and drop them in a bucket of soapy water, or use an organic insecticide, such as neem oil or pyrethrin.  Potato leafhoppers, which are small, green, winged insects that suck the sap from the leaves and cause them to curl and yellow. You can spray them with a strong jet of water, or use an organic insecticide, such as garlic or hot pepper spray.  Wireworms, which are thin, brown, worm-like larvae that bore into the tubers and cause holes and tunnels. You can trap them with pieces of carrot or potato buried in the soil, or use beneficial nematodes, which are microscopic worms that parasitize and kill the wireworms.  Common Potato Diseases  One of the most common reasons why a potato cannot grow or survive is the diseases. If you were wondering what some of these can be and how to deal with them, I have you covered!  Some of the common potato diseases are:  Late Blight: It is a fungal disease that causes brown spots on the leaves and stems, and black or brown lesions on the tubers. It can spread rapidly and destroy the entire crop. You can prevent it by planting resistant varieties, avoiding overhead watering, and removing any infected plants and tubers. You can also use a fungicide, such as copper or sulfur, as a preventive measure.  Scab: This is a bacterial disease that causes rough, corky patches on the tubers. It does not affect the taste or edibility of the potatoes, but it reduces their appearance and storage quality. You can prevent it by planting resistant varieties, maintaining a slightly acidic soil pH, and avoiding excessive nitrogen fertilization.  Potato Virus Y: Lastly, this is a viral disease that causes mosaic patterns, mottling, or yellowing on the leaves, and misshapen or knobby tubers. It can reduce the yield and quality of the potatoes, and it can be transmitted by aphids or infected seed potatoes. You can prevent it by planting certified virus-free seed potatoes, controlling aphids, and removing any infected plants and tubers.  How to Determine When Your Potatoes Are Ready to Harvest?  The third step in how to harvest potatoes is to determine when they are ready to harvest. This depends on the type and variety of potatoes you planted, and the size and maturity you want. There are two main types of potatoes: early and late. Early potatoes are ready to harvest in about 10 to 12 weeks (about 3 months) after planting, and they produce small to medium-sized tubers that are tender and thin-skinned. They are best for boiling, steaming, or roasting.  Late potatoes are ready to harvest in about 15 to 20 weeks (about 4 and a half months) after planting, and they produce large, starchy tubers that are firm and thick-skinned. They are best for baking, mashing, or frying.  Early Harvesting  To harvest early potatoes, you can start digging them up when the plants begin to flower, or when the lower leaves start to yellow. You can use a garden fork or a spade to gently lift the plants and tubers from the soil, or you can use your hands to feel for the tubers under the soil. You can harvest as many or as few potatoes as you need, and leave the rest in the ground until you are ready to use them. You can also harvest some of the young, tender leaves and stems, which are edible and nutritious.  Late Harvesting  To harvest late potatoes, you need to wait until the plants have died back completely, or until the first frost. This allows the tubers to develop a thicker skin, which helps them store better. You can use a garden fork or a spade to dig up the entire row of plants and tubers, or you can use a potato digger, which is a special tool that lifts and separates the tubers from the soil. You need to be careful not to damage or bruise the tubers, as this can cause rotting or spoilage.  How to Dig Up, Cure, and Store Your Potatoes?  The final step in how to harvest potatoes is to dig up, cure, and store your potatoes. This is important to preserve the quality and shelf life of your potatoes, and to prevent them from sprouting, rotting, or shrinking. Here are the steps to follow:  Digging Up  After digging up your potatoes, you need to brush off any excess soil and remove any damaged, diseased, or green tubers. Do not wash your potatoes, as this can remove the protective skin and invite bacteria and fungi. You can wash them just before cooking or eating them.  Curing  You need to cure your potatoes for about two weeks in a cool, dark, and well-ventilated place, such as a basement, garage, or shed. This allows the skin to harden and heal any minor cuts or bruises and enhances the flavor and texture of the potatoes. The ideal temperature for curing is between 50°F and 60°F, and the ideal humidity is between 80% and 90%. You can spread your potatoes in a single layer on a newspaper, cardboard, or wooden crate, and avoid exposing them to light, which can turn them green and bitter.  Storing  You need to store your potatoes in a cool, dark, and dry place, such as a cellar, pantry, or closet. The ideal temperature for storage is between 40°F and 50°F, and the ideal humidity is between 65% and 70%. You can store your potatoes in paper bags, cardboard boxes, mesh bags, or wooden crates, and check them regularly for any signs of sprouting, rotting, or shriveling. You can also store your potatoes in a root cellar, which is an underground or partially underground structure that maintains a constant temperature and humidity. Additionally, you can also store your potatoes in a clamp, which is a mound of straw, hay, or leaves covered with soil, that insulates and protects the potatoes from frost and rodents.  Wrapping It Up!  If you want to know about how to harvest potatoes, I hope that this blog has been of help to you. However, if there are any other queries related to the same, please feel free to let me know. All that you need to do is scroll down till you reach the bottom of the page. Then leave your comments and suggestions in the box below. And I will be there to answer them all for you! Read Also: How to Harvest Lettuce: A Step-by-Step Guide for Fresh and Crispy Salads Everything You Need To Know About Harvesting Basil!

READ MOREDetails
Glace Fruit

How to Glace Fruit, and Why You Need to Order It Instead

Glacing is a process where you preserve fruit in sugar syrup. The process helps in making the fruits sweeter and allowing them to last long. Usually, you can find glace fruits in cakes, bread and other types of pastries. The most common fruits are pears, cherries, and plums. They already taste great as whole fruits, but the flavours come to life, even more, when you choose the glazed version. If you are running a pastry business, you might be familiar with glace fruits as you use them often. You can choose to glace the fruits if you want to use homemade glace fruits for your business. To glace them, you need to have a pound of fruit that you want, four and a half cups of white sugar and a half cup of corn syrup. It is an excellent idea to glace them at once to avoid going through the entire process several times. You can peel the fruits or slice them into quarters depending on the type of fruit that you are glacing. You will then place the sliced or peeled fruits at the bottom of the saucepan. Add water, and allow it to simmer until it becomes tender. Take the fruit out of the saucepan and place it on a shallow dish. Remove the water from the pan except for about a cup. Add a half cup each of the sugar and corn syrup into the water. Turn the heat on until the sugar starts to dissolve. Allow it to boil and place the mixture over the fruit. Let it stay there overnight. On the following day, take the syrup out and place it in a pan. Add another half cup of sugar and allow it to dissolve in heat. When the mixture boils, start putting in the fruits again. After a while, take everything out and transfer it to a container where you can leave it for the next five days. Repeat the process, and keep the fruits there for the next two days. After another repetition, the syrup will start looking like honey. Return the fruits to the mixture and let them soak there for about ten days to 3 weeks. It is up to you to decide how long you will allow the fruits to soak in the mixture. After that period, take the fruits out from the syrup and arrange them on a wire cooling rack. Let the fruits dry in a warm place or put them inside a dehydrator. Once you can no longer feel a sticky surface, you can take the fruits and place them in a jar. If you want to eat the fruits, you can rehydrate them or put them directly on cakes and pastries. You don’t need to go through this process: It might seem like a long process to glace fruit. Aside from the effort, you put into it, you also need to wait for quite some time before you can finally use the fruits. If you are running a pastry business, you already have a lot on your plate, and you don't want to waste more time to glace the fruits. If you don't want to wait, you can buy them online. You can find stores that sell glace fruits in bulk. You can get them at a low price too. As long as you don't see chemicals or preservatives added, it is okay to use these glace fruits. Read Also: Stay Away From These Foods To Remain Healthy The Top 10 Best Foods To Eat In Early Pregnancy

READ MOREDetails
Blackheads

Top 4 Natural Combination for You to Eliminate Blackheads

Having a bright glowing and flawless skin is one short way to bring you confidence when communicating with others. But let’s face it; it is a very difficult task since our skin is exposed to many pollutants, dirt, sunlight and countless other harmful factors. One common skin problem to be named is blackheads which are annoying and potentially stressful to deal with. Many people resort to cleaning strips to pull out those annoying blackheads, but they also bear the risk of irritated or dried skin, not to mention the fact that these products are pricey and painful to remove. In this article, we provide some natural ways you can try to get rid of blackheads. One common feature of these formulas is that they all use all-around, simple, natural and safe ingredients. 1. Egg White Mask Egg white, also called glair gained its popularity as number one blackheads remover thanks to its ability to wipe off dirt, dead skin cells. Plus, egg white can visibly tighten your pores and whiten your skin tone. How to use: Prepare an egg white, add 1 teaspoon of honey for better moisture. Apply one thin layer of egg white to your face, place a strip of tissue paper to your face. Allow it to dry completely then gently peel the mask. The peeling will pull out the blackheads. If you want a thicker mask, apply the second and third layer using the same method. The key point is to let it dry properly. 2. Turmeric and Mint The benefit of turmeric to blackheads removal can be attributed to its powerful antibiotics, antiseptic and anti-inflammatory properties. It can easily absorb excess oil, eliminate dead skin cells and brighten the tone; while mint can soothe the skin with its cooling effect. How to use: Make a mixture of 2 teaspoon of turmeric powder and 3 teaspoons of mint juice to create a paste. Apply the mixture and keep it on for 15-20 minutes before rinsing your face with water. Perform twice a week for best result. 3. DIY Peel off Mask with Clay As it turns out, those expensive peeling masks they sell out there are not hard to make. You can totally make yourself a peeling mask to get rid of blackheads with some charcoal powder and glue. This mask can sweep away all the dirt and impurities that block your pores and dry out excessive oil. How to make: Mix one tablespoon of activated charcoal powder with enough glue to make a thick yet spreadable paste. Open the pores by dabbing with a warm cloth in your face about 1 to 2 minutes. Apply the paste on blackhead affected areas. Let it dry completely and slowly peel off the mask. 4. Baking Soda This versatile ingredient never fails to surprise us. The antiseptic quality not only makes it an excellent exfoliant that can sweep away all the dead skin cells and impurities that cause blackheads. It is also a great tool to neutralize the pH of the skin. How to use: Make a paste from baking soda and some water. Apply the mixture on your face and let it dry for about 15 minutes before rinsing with water. Perform this formula once or twice a week, you will find those ugly blackheads disappear in no time. 5. Lemon and salt Lemon deserves a spot in this list because it can remove the deepest blackheads. The acid citric in lemon makes it a good exfoliant and brighten the skin tone by burning the topmost layer of skin cells; while salt which antibacterial properties help fight against germs and bacteria worsening the situation. How to use: Mix ½ teaspoon of lemon juice, 1 tablespoon of sea salt and 1 teaspoon of honey. Use this mixture to massage your face, and then wash with cool water. It is safe to perform this action twice a week. The change you see is incredible. However, don’t forget to apply sunblock every day. Read also: Top 7 Superfoods For Healthy Skin And Hair 5 Protein Enriched Food To Improve Mental Health Top 4 Natural Combination for You to Eliminate Blackheads (Infographics)  

READ MOREDetails