Published on: 21 August 2021
Last Updated on: 10 January 2025
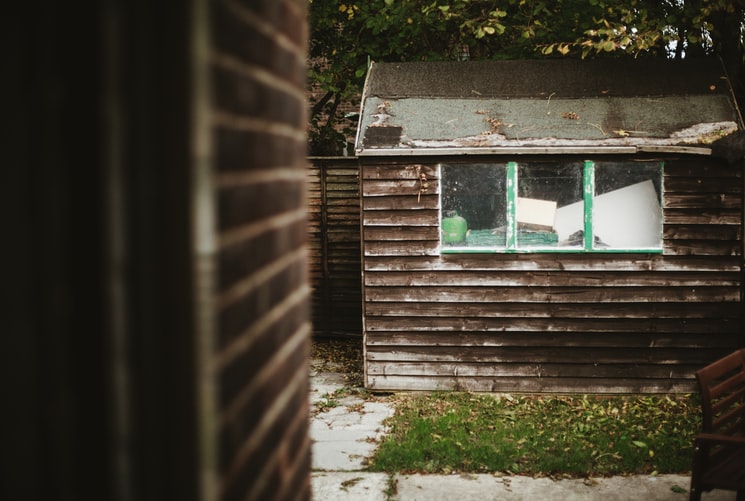
In your garden, you can add more style and storage with the help of outdoor garden sheds. Once you are ready to invest in a garden shed, you have to decide about materials and design. Nowadays, sheds come in several materials and styles. For this reason, it can be confusing to choose the best storage shed.
What Are The Material Which Is Using For The Garden Sheds?
People find it difficult to choose between concrete, metal, and wood. Each material offers different benefits and drawbacks. However, it is essential to compare each material before finalizing your decision.
The materials of the garden sheds depend upon your requirements of the sheds. For the fancy sheds lover, the lightweight materials are ok, but when you want to fulfill some extra purposes like the storage and organizers, the heavy metals are good to select.
4 Best Materials For The Garden Sheds
The best decision may depend on security, customization, appearance, and durability. If you want to make an informed decision, make sure to understand the characteristics of each material.
Here are the four materials which you can use to build the garden sheds.
1. Metal Sheds
Metal sheds are lightweight and durable. These are famous because of their designs and cost. You have to anchor them to the floor. Typically, the metal garden sheds are made of galvanized aluminum or steel. You will get different colors and styles of metal sheds in the market. Remember, Absco sheds at Wholesales Direct can be the best choice for you.
These sheds are available in different colors, but you have to paint them. Remember, repainting will help you to maintain a classic fresh look. Unfortunately, metal sheds may have to dent and rusting according to the weather. For this reason, you should choose a durable foundation to store in heavy equipment.
2. Wooden Sheds
For garden sheds, wood is a favorite choice. People often prefer it to increase the aesthetics of their garden. Remember, wood is customizable; therefore, you can change things with time. You are free to paint them if desired. Remember, the nature of wood allows you to increase storage options because you can add cabinets and shelves.
In the case of wood sheds, you are completely free to create a shape or size. You can use your desired colors to complement your surroundings or house. Feel free to dress them with desired features, such as window flower boxes.
Kits of wooden sheds can be expensive as compared to metal or resin sheds. Undoubtedly, wood is a strong material but vulnerable to deterioration and rot. The paint finish on the shed may fade and peel over time that requires frequent maintenance and repainting.
3. Resin Sheds
Resin sheds or plastic sheds may contain high-density polyethylene or vinyl. These are made of high-quality material. Yet, it is durable and more robust than wooden sheds. For ultimate durability and strength, people use steel support.
Remember, these sheds are free from maintenance. You will get several size options. Undoubtedly, the kit is solid and easy to assemble. Resin sheds look decorative and attractive with neutral colors garden sheds. Put perfect choice able potting benches, and get astonished seeing the entire combination how damn transform your garden! These come with a nicely finished interior with plastic floor and wall panels.
4. Concrete Sheds
Indeed, concrete garden sheds are durable and offer incredible security for valuable possessions. It will help you to increase the security of your room. Unlike wood and metal, concrete sheds are permanent fixtures. You are free to customize this shed according to your needs.
It will be easy for you now to compare different materials and choose the best one according to your needs and budget.
Conclusion:
The decorative garden sheds are not only looking very glamorous for your garden interior but also provide ample benefits to your garden. Apart from that, your garden is going to look more organized and subtle with the niche selections with the all purposes garden sheds. Choose the right one for your garden, and do not compromise the quality of the materials. You may be thinking this is an interior part. But your garden sheds are going to need weather protection. So choose wisely.
Content Rally wrapped around an online publication where you can publish your own intellectuals. It is a publishing platform designed to make great stories by content creators. This is your era, your place to be online. So come forward share your views, thoughts and ideas via Content Rally.
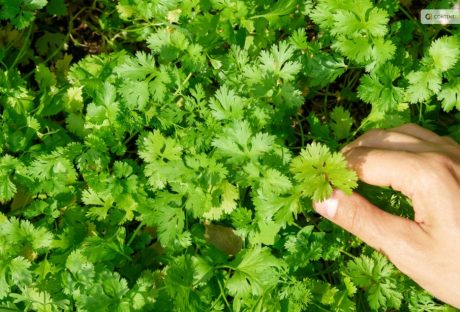
One of the most used herbs in the world, cilantro, is also referred to as Chinese parsley or Coriandrum sativum. Fresh and zesty, cilantro gives your recipes a flavor boost. Mexican, Middle Eastern, Indian, Mediterranean, Chinese, African, and even Scandinavian cuisines use it extensively. Even cilantro microgreens are grown from it!
Since cilantro itself doesn't keep well and loses aroma and flavor once dried, most people prefer to use it fresh. To have cilantro on hand, you should also have a few plants in the garden.
You can harvest the plant for its flavorful cilantro seeds, also known as coriander, even if you don't use the leaves in your recipes. The leaves of the cilantro plants come throughout the spring and summer. Allow them to go to seed at that time since they grow easily in the garden!
You must know how to harvest cilantro properly if you want to have a steady supply. Keep reading to find out all you need to know about harvesting cilantro.
Harvesting Cilantro: Overview
Most people either love or hate the flavor of cilantro leaves. However, you should still think about cultivating a few coriander plants in your garden and saving the seeds for a range of culinary uses.
Most people in the US grow this delicious herb for its leaves. But the tasty coriander seeds are also worth harvesting. They have a distinct flavor from cilantro leaves. This fragrant herb of the cool season, cilantro, quickly goes to seed in the long, sweltering summer months.
As the plant reaches higher in the sky, its rounded, lobed leaves become feathery. Pretty clusters of tiny white blossoms quickly emerge. Many pollinators are drawn to these nectar- and pollen-rich blossoms, particularly syrphid flies and honeybees. Little round coriander seeds with a kelly green color emerge as the blossoms start to fade.
What To Expect from Cilantro?
The distinctive flavor of coriander is citrusy and slightly nutty. It goes incredibly well with rice, beans, lentils, and roasted or grilled veggies. You can pick the seeds while they are still young and vibrant green. Or you can wait until they start to turn brown.
Since green coriander seed is only found in gardens, it is better to harvest them when they are still green because of their stronger, more distinct flavor. You will not find them in the farmers’ market or the grocery store.
If the seeds are kept in a glass container with a lid, then they can be refrigerated for several weeks and frozen effectively as well. Wait until most of the seed turns brown if you want to harvest the mature brown seed for winter grinding or planting next year.
Next, trim off a few inches of stalk and the seed heads, then hang them upside down in a brown paper bag. The seeds will drop out of the heads and land in the bag's bottom once they are completely dry. The dry seed should be kept in a dry, cool place in a glass jar with a lid.
For optimal flavor, grind it just before using. The flavor difference between freshly ground coriander seed and the pre-ground variety typically found in stores will astound you. Try adding green coriander seeds to dressings and marinades. Frequently adding an equal amount of ground coriander to recipes that call for cumin makes the flavors of the two go particularly well together.
How to Harvest Cilantro?
The most exciting aspect of growing plants is undoubtedly harvesting. Pick individual cilantro leaves if you plan to use a small amount. It is best to leave at least 1-2 inches of stem above the soil's surface when harvesting larger quantities of cilantro.
It is preferable to leave a few lower leaves on the plant to support the herbs until they grow back. To cut the stems cleanly, use harvesting snips, long reach harvesting snips, or sharp, sterilized garden shears. To guarantee that your herbs regrow, it is best to remove only a small portion of the plant at a time.
Furthermore, when the cilantro plant blooms and sets seed, the herb may start to taste bitter. So, when wondering how to harvest cilantro, it is preferable to harvest before the plant bolts because the leaves will be less appetizing at that point.
When is The Best Time to Harvest Cilantro?
When the morning dew has cleared and the sun hasn't set, it's the ideal time of day to harvest a variety of fruits, vegetables, and herbs, including cilantro. This way you can lessen the stress on your cilantro plant and give the fresh stock cuts enough time to dry before dusk, which lowers the risk of illness.
Before it bolts, harvest cilantro when it is 6 to 8 inches tall. The flavor of cilantro leaves significantly decreases after they have bolted. The lifespan of the cilantro plants can be increased by careful and routine harvesting. It is crucial, though, to wait for your plant to become established before beginning to harvest.
The plant develops numerous long, thin stems as it grows. They are ready to be harvested when the stems are long, and the leaves have a lacy appearance. The cilantro herbs are about ten to twelve inches tall at this point. Gather your cilantro in the spring and into the first part of the summer.
Your plants may bolt to seed if summertime full sun conditions prove to be too hot for them. The best time to harvest cilantro is early morning. You can either choose to harvest it once a week or source just individual leaves whenever you need them.
Most of the time, it takes about 2-3 weeks for regrowth, so you must harvest accordingly. You must remember that regular cut-and-come-again harvesting is the most ideal while the plant keeps producing foliage.
How To Store Fresh Cilantro?
Part of knowing how to harvest cilantro is also knowing how to store them. It's best to know how much you should take from the garden before you harvest. You will need to learn how to store cilantro if you do not intend to use the leaves right away to extend its shelf life. There are several approaches to try.
Storing Cilantro in Water
To keep the cilantro leaves dry, wait to wash them after harvesting. For storage purposes, store the stem ends in a glass or jar with 1 to 1.5 inches of water and refrigerate for a few days. At a minimum, change the water once a day. Use a plastic bag to cover the top loosely to preserve the humidity surrounding the herbs.
Storing Cilantro in The Freezer
Freezing cilantro is another low-maintenance way to store it. Shake off any extra moisture and rinse the leaves to get rid of any garden soil. Tear the leaves into small pieces and stuff them into ice cube trays, covering the herb with just enough water to barely cover.
You can pre-measure if you'd like to ensure that you know precisely how much is in each cube for recipes in the future. After the cubes are completely frozen, place them in a freezer bag. Add as needed to marinade, smoothies, soups, and sauces. You can freeze cilantro for up to six or eight months.
Read More: Everything You Need To Know About Harvesting Basil
How To Dry Cilantro?
There are two methods for drying cilantro. You can use the oven to dry cilantro. Since hot air can greatly affect the flavor of the finished and dried herb, you might want to avoid using heat if you want to enjoy flavorful dried cilantro.
Air drying or hanging drying is a better way to dry cilantro. Gather the stems of the herbs into a small bunch and secure them with a string. Place the bunch in a dark, well-ventilated area and hang it upside down. Alternatively, you can wrap the bunch in a brown paper bag to keep the cilantro from getting dusty.
After the bunch has been hanging for about a week, begin to check its level of dryness every day or two. It's ready to be crushed or powdered and stored for later use when it crumbles when touched.
Cure the cilantro ahead of time to reduce the possibility of mold growth. Put the dried cilantro in a glass mason jar to cure. Open the jar and give it a good shake every day to let fresh air into it and mix the contents. This will assist in achieving moisture content parity. If you'd like, you can also include a moisture-absorbing packet.
How To Harvest Cilantro Seeds?
You can harvest the coriander seeds even if you don't like cilantro leaves. The plant can grow to 20 inches when it flowers. This requires temperatures above 75 degrees. Pods will form once they have flowered, and the flowers will fade.
Before being harvested, these should be green to brown in color. These pods release the mature seed when it's ready. Tie the stems with the seed pods still attached into a bunch. Next, hang them upside down in a paper bag in a cool, dry place to harvest the seeds.
With time, the seeds will sprout and drop into the bag. Store your seeds in a dry, cool place in an airtight jar. Unground dried seeds can be kept for three to four years in storage. Before using dried seeds in your recipes, grind them for the best flavor.
How To Harvest Cilantro So It Keeps Growing?
If you sow cilantro seeds every two weeks from spring until late summer, you can be sure to always have fresh leaves available. We advise chopping them up and firmly packing them into an ice cube tray filled with water. Then, just place the tray in the freezer. These can then be added directly to hot pans when preparing soups or sauces. Or they can be dropped into hot or cold water for cooking or drinking.
What To Do If Cilantro Bolts?
It's time to collect and preserve your own coriander seeds once your plant produces seeds. Picture each of those tiny white blossoms turning into a flavorful spice for your cooking or seeds for the following year! In addition to being aesthetically pleasing and tasty, cilantro flowers are also excellent pollinators.
There is a short window of time when the growing seasons of cilantro and tomatoes coincide. This proves they go well together. It usually happens that my tomato and pepper plants are just starting to take off when my cilantro plants bolt, sending forth gorgeous white flowers.
To maximize the amount of fruit your plants produce for you, beneficial insects that are feeding on your cilantro flowers will collide with your fruiting plants, vibrate their leaves, and assist in pollination. Ladybugs, butterflies, and bees all love cilantro flowers. It truly is a win-win!
Choose Slow Bolt Seeds
Seek out seed packets labeled "long-standing" or "slow bolt cilantro," as these varieties have been cultivated to endure longer in the garden. You can find your go-to slow bolt seeds that are 100% certified organic from Seeds of Change.
Finding a local seed producer is another smart move. Buying local seeds means you'll be growing a climate-adapted variety of cilantro, which increases the likelihood that you'll keep it longer.
Harvest Cilantro Regularly
Regularly chop your cilantro leaves. This preserves the health of the plant and guarantees that the leaves of this herb are fresh when you use them. Your cilantro will continue to produce new leaves from the center of the plant if you regularly harvest it by chopping off the older outer leaves.
Additionally, your chances of cutting off those immature flower stalks increase with the amount of cilantro you harvest. This will aid in postponing any bolting.
Since cilantro is incredibly obstinate, you can delay as long as you can. Cut that thick center stalk as soon as possible. After that, the plant will start to send outside shoots, giving you a little extra cilantro before it eventually bolts completely. For sun protection, surround your cilantro with tall plants.
Plant Taller Plants Around Cilantro for Sun Protection
Encircle your cilantro with large warm-season plants (like tomato or pepper plants) so that the taller plants can shade your herbs slightly and help keep the soil cooler as the temperatures rise. After all, four to six hours of sun is sufficient for cilantro to grow. To increase the lifespan of your cilantro in the garden, interplant it with larger plants.
Wrapping Up
You will need to have patience if you want to collect the seeds for your cilantro. Before seeds can be harvested, cilantro needs to blossom. Before harvesting, the resulting seed heads need to be allowed to dry on the plant for a while.
Harvesting the seeds is then as simple as shaking them into a paper bag or chopping off the entire seedhead and placing it inside the bag. If you have thoughts to share or questions to ask about how to harvest cilantro, please leave a comment below. We would love to hear from you!
Read Also:
Asparagus 101: When, How, And How Often To Harvest?
Some Facts You Need to Know About Rainwater Harvesting
How to Harvest Lettuce: A Step-by-Step Guide for Fresh and Crispy Salads
So you found a perfect and you are ready to move? And to complete that mission, you need to find movers online. But how are you going to do that? How are you going to find the best relocation specialists?
We often get confused as to how we might select a moving company when shifting houses. However, in 2019, there are many expert moving companies that specialize in different types of moving. For example, you have a standard home movers. You can also enlist the services of a professional office moving company that can help you switch offices from one location to another. Then there are specialized movers, whose expertise lies in moving expensive pieces of furniture like piano, antiques, and paintings. No matter what your requirement, you will always be able to find a mover, who is an expert at that.
How to start a search?
The key is to gather every information you can about those moving companies and how they determine the cost. This is critical, as it will help you calculate your costs. This will also be able to give you a fair idea about the level of professionalism and expertise of the moving company.
Select a few moving companies and ask for moving quote!
Find movers online!
If there is one business industry, which you need to trust with your life, it is the Moving Industry. From million-dollar supercars to an antique marble statue, moving companies can cost you irreparable damages. I have often seen people look for the cheapest moving companies. In my personal experience, price or fee should never be a consideration when selecting a moving company. You should rather look for expertise and professionalism.
If you really want to vet the company, you should ask for references, their skill certificates and examine how long they have been in the industry. Remember, that you are entrusting them with nearly all the material wealth in your home. The combined value of such wealth will definitely be more than a few hundred dollars. Try not to employ the services of amateurs who can destroy or damage your belongings. Good moving professionals can save you a lot of trouble and stress, and they can help you how to organize your move in a safe manner.
Since you don't want to find out too late that you have trusted a company that did not take good care of your home’s possessions it pays to do a little bit of research. The best place to start out is by looking up all of your alternatives. The phone book is usually not the most comprehensive source of listings, so you may want to check online instead. Information online is generally going to be far more valuable, and that will save you a lot of troubles. Also, you should know that many companies want to post up plenty of info about themselves as a key way of winning over those that they want to do business with. So, you can learn a lot with just a little reading and of course, it's a good idea to go further than this, as well.
Do your research to find the best movers!
When you need to find movers online, you have to do good research. And thanks to that, you will gather more information and by that, the opportunity of finding the best company who will with your relocation. For example, you can search on Master Moving Guide. This place has professionals who will help you find the best movers online. They can provide you with everything you need. All you have to do is fill in some information about your relocation, and they will suggest you some potential moving companies.
You must consider everything when you are about to find movers online!
Check your movers
When you create the ultimate moving checklist – things you need to do when moving, now who have to get one of the best moving professionals. And when you find, you need to make sure that you can trust them.
This is why you need to look up references and see whether the moving company is any good or not. You can do this in two ways. You can ask the company yourself about some of their past customers. You can contact them and check whether they had done a good job or not. Alternatively, you can go on the internet and check for online reviews. There are many platforms, which can help you in this regard. From the company’s GMB page to online directories, and even social media channels like Facebook. Once you are certain that they are experts, you can go ahead and select them.
How much does the moving cost?
This is something that does not have a fixed answer. It depends on the number of goods you are moving, as well as what the company is asking for you. If you want to proceed, you should always ask the company for a detailed quote. The best companies would request you to allow them to visit the property and see the number of goods. Amateur companies who are only interested in money and your business will give you a surprising figure. However, these companies cover many hidden costs that they reveal only after they send you the final bill. Make sure that you decide on all the charges, including taxes, before you sign them up. Now, all you have to do is to see a list of last-minute things you should check before you move house, and you will be ready for your movers.
Make sure you have enough in your budget when you are about to hire the best movers for your relocation.
Conclusion:
When you have to find movers online, the most important thing is that you recognize good from fraudulent ones. To do that, you need to be very careful, and you need to know signs of fraudulent movers. Because only when you know those, you will be able to apart them. If you think that you can't find movers online there are some other options. You can always ask your friends and family who has recently moved for some recommendation.
Read Also:
Moving Companies And How They Determine Cost
The Ultimate Moving Checklist – Things You Need To Do When Moving
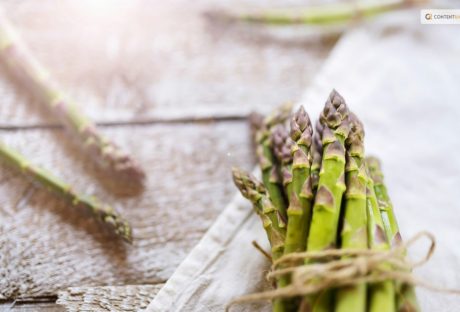
If you are a gardener like me, you must have thought about harvesting greens that you eat at restaurants at your house. One of these days, I was with my friends from my university, and we were discussing the importance of eating veggies for staying healthy. And they could not figure out the best ways to effectively do so. Reading my previous blog about cilantro, Laila asked me, “how to grow and harvest asparagus?”
Well, surely asparagus is one of the most delicious and nutritious vegetables you can grow in your garden. But what a lot of people do not know is that it's also one of the easiest once you know how to harvest asparagus properly.
In this article, I will cover everything you need to know about harvesting asparagus, from when to start, how to cut, and how often to do it. Additionally, I will also share some tips on how to store and freeze asparagus, as well as the benefits of eating this green wonder.
So, keep on reading till the end to learn more...
How Does Asparagus Grow?
Before I dive into the seemingly difficult process of how to harvest asparagus, let me help you grow it.
Asparagus is a perennial plant that grows from a crown of roots that can live for up to 20 years. The crown produces spears, which are the edible part of the plant, every spring.
The spears grow rapidly, sometimes up to an inch per day, and can reach a height of 6 to 10 inches. The spears are harvested before they open into fern-like leaves, which are edible and tough.
Asparagus grows best in well-drained, sandy soil with a pH of 6.5 to 7.5. It prefers full sun and moderate temperatures and needs regular watering and fertilizing.
Asparagus can be grown from seeds or crowns, but crowns are easier and faster to establish. Crowns are planted in trenches about 12 to 18 inches apart and covered with 2 to 3 inches of soil. As the spears emerge, more soil is added until the trench is filled
Benefits of Asparagus
https://giphy.com/gifs/food-asparagus-taylor-lee-nicholson-pejh5q5BBXxi2m4PgF
Asparagus is not only tasty, but also healthy. It's low in calories and high in fiber, vitamins, minerals, and antioxidants just like spinach. It can help lower blood pressure, regulate blood sugar, support digestion, and prevent urinary tract infections.
Asparagus also contains a compound called asparagine, which is a natural diuretic that helps flush out excess fluids and salts from the body. Asparagus is also a good source of folate, which is essential for pregnant women and fetal development
When to Harvest Asparagus?
The first year after planting, you should not harvest any asparagus spears, as they need to grow and strengthen the root system.
The second year, you can harvest a few spears for a short period, about two to three weeks.
The third year and beyond, you can harvest asparagus for a longer period, up to eight weeks, depending on the climate and the health of the plants.
The best time to harvest asparagus is in the early morning when the spears are crisp and tender. You should harvest asparagus when the spears are about 6 to 10 inches tall, and before the tips start to open up. If you wait too long, the spears will become woody and bitter.
How to Plant and Care for Asparagus?
Asparagus is a long-term investment that can reward you with years of delicious harvests. However, it requires some planning and preparation before planting.
Here are some steps to follow to plant and care for asparagus:
Choose the Day
Choose a sunny and well-drained spot in your garden, preferably with sandy or loamy soil. Avoid areas where water tends to pool or where weeds are hard to control. Asparagus also needs plenty of space, so make sure you have at least 4 to 5 feet between rows and 12 to 18 inches between plants.
Prepare the Soil
Prepare the soil by adding organic matter, such as compost or manure, and adjusting the pH to 6.5 to 7.5. You can use a soil test kit to check the pH and nutrient levels of your soil. You may also need to add some fertilizer, such as 10-10-10 or 10-20-10, to boost the phosphorus and potassium content.
Dig it Deep
Dig a trench about 8 to 12 inches deep and 12 to 18 inches wide. You can make the trench longer or shorter depending on how many asparagus crowns you have. Asparagus crowns are the dormant roots of the plant that you can buy from nurseries or online. They usually have one-year-old or two-year-old crowns, which are more reliable and productive than seeds.
Fertilize
Spread some fertilizer along the bottom of the trench, about 2 pounds per 100 square feet. Then, cover the fertilizer with 2 to 3 inches of soil, forming a ridge in the center of the trench.
Placing the Plant
Place the asparagus crowns on top of the ridge, about 12 to 18 inches apart, with the buds facing up. The crowns should be slightly below the soil surface, about 1 to 2 inches deep. Do not bury them too deep, as this will delay the emergence of the spears.
Focus on the Crown
Cover the crowns with another 2 to 3 inches of soil, and water well. As the spears grow, gradually fill in the trench with more soil, until it is level with the ground. This will help protect the crowns from frost and weeds.
Add Mulch
Mulch the bed with straw, leaves, or wood chips, to conserve moisture and prevent weeds. You can also add some organic fertilizer, such as fish emulsion or seaweed extract, every few weeks during the growing season, to encourage healthy growth.
Keep in Mind
Do not harvest any asparagus spears in the first year, as they need to establish a strong root system. In the second year, you can harvest a few spears for a short period, about two to three weeks. In the third year and beyond, you can harvest asparagus for a longer period, up to eight weeks, depending on the climate and the health of the plants.
How to Harvest Asparagus?
Now, coming to the most important part that you wanted to know about. Let us talk about the ways to harvest asparagus!
To harvest asparagus, you need a sharp knife or a pair of scissors. You should cut the spears at the base, about an inch below the soil surface.
Be careful not to damage the crown or the emerging spears. You should also avoid cutting too many spears from one plant, as this will weaken the plant and reduce the yield. A good rule of thumb is to leave at least one-third of the spears on each plant.
You should harvest asparagus every day or every other day, depending on how fast the spears grow. You should stop harvesting asparagus when the spears become thinner than a pencil, as this indicates that the plant is running out of energy.
You should then let the spears grow into ferns, which will replenish the crown and prepare it for the next season.
How to Store and Freeze Asparagus?
Unlike lettuce, which you can store for more than a week, asparagus is best eaten fresh, as it loses its flavor and texture quickly. If you can't eat it right away, you should store it in the refrigerator for up to a week.
To keep it fresh, you should trim the ends of the spears and stand them upright in a glass of water or wrap them in a damp paper towel and put them in a plastic bag.
If you want to preserve asparagus for longer, you can freeze it. To freeze asparagus, you should first wash and trim the spears, and then blanch them in boiling water for two to three minutes, depending on the thickness.
Blanching is a process of briefly cooking and cooling the vegetables to stop the enzyme activity that causes them to spoil.
After blanching, you should drain and cool the spears, and then pack them in freezer bags or containers, leaving some space for expansion. You can freeze asparagus for up to a year, and use it in soups, casseroles, or stir-fries.
How to Prevent and Treat Asparagus Pests and Diseases?
Asparagus is generally a hardy and resilient plant, but it can still suffer from some pests and diseases that can affect its growth and quality.
Here are some of the most common problems that affect asparagus plants, and how to prevent or treat them:
Asparagus beetles
These are small, black or red beetles that feed on the spears and the ferns, causing them to wilt and turn brown. They can also lay eggs on the spears, which hatch into larvae that chew on the stems and leaves.
To prevent asparagus beetles, you should keep the area around the plants clean and weed-free, and remove any old or damaged spears. To treat asparagus beetles, you can hand-pick them and their eggs, or spray them with insecticidal soap or neem oil.
Fusarium wilt
This is a fungal disease that infects the roots and the crowns of the plants, causing them to rot and die. It can also cause the spears to become yellow, twisted, and stunted. Fusarium wilt is more likely to occur in poorly drained, acidic, or infested soil.
To prevent fusarium wilt, you should plant disease-resistant varieties, rotate crops, and avoid overwatering or injuring the plants. To treat fusarium wilt, you should remove and destroy any infected plants, and apply fungicides to the soil.
Rust
This is another fungal disease that affects the ferns, causing them to develop orange or brown spots and pustules. Rust can reduce the vigor and yield of the plants, and make them more susceptible to other diseases. Rust is more likely to occur in humid, wet, or shady conditions.
To prevent rust, you should plant resistant varieties, space the plants well, and prune any excess or infected ferns. To treat rust, you should apply fungicides to the ferns, and avoid watering them from above.
Crown rot
This is a bacterial disease that causes the crowns and the bases of the spears to become soft, mushy, and foul-smelling. Crown rot can spread quickly and kill the plants. Crown rot is more likely to occur in wet, compacted, or poorly drained soil.
To prevent crown rot, you should plant healthy crowns, improve the drainage and aeration of the soil, and avoid overwatering or injuring the plants. To treat crown rot, you should remove and destroy any infected plants, and disinfect the tools and the soil.
Bonus: How to Cook and Enjoy Asparagus?
There are many ways to cook and enjoy asparagus, from steaming, boiling, roasting, grilling, to sautéing. The key is not to overcook it, as it will become mushy and lose its flavor.
You should cook asparagus until it is bright green and crisp-tender, which usually takes about 5 to 10 minutes, depending on the method and the thickness of the spears.
You can season asparagus with salt, pepper, butter, lemon juice, garlic, herbs, cheese, or any other condiments you like. You can also pair asparagus with eggs, bacon, ham, chicken, fish, pasta, rice, or salad. Asparagus is a versatile and delicious vegetable that can complement any meal.
Wrapping It Up!
Asparagus is a wonderful vegetable that you can grow and harvest in your own garden. It's easy to care for, once you know how to harvest asparagus properly.
You should harvest asparagus when the spears are about 6 to 10 inches tall and before the tips start to open up. You should cut the spears at the base and leave some on the plant to grow into ferns. It would be best to store asparagus in the refrigerator for later use.
And yes, you should also enjoy the many benefits and flavors of asparagus, by cooking it in various ways and pairing it with different dishes. Asparagus is a springtime delight that you don't want to miss.
Learn More About:
Planting & Harvesting Mint
7 Health Benefits of Black Seed Oil
Spirulina: The Complete Plant Based Protein Source | Health Benefits