How To Create A Poll On Facebook: The Ultimate 2026 Guide For Brands

Published on: 03 January 2024 Last Updated on: 15 September 2026
How to Create a Poll on Facebook Step by step guide

In the hyper-competitive digital landscape, companies are constantly searching for innovative approaches to connect with their target market, 

True audience engagement leads to deeper and more meaningful digital connections. This stands as one of the primary advantages of modern social media marketing. 

When a brand initiates a transparent and two-way online conversation, it naturally fosters a stronger sense of consumer trust and builds favorable brand associations. 

Furthermore, having frank and direct conversations with your followers on social media gives you invaluable and first-hand insights into the messages, pain points, and desires that resonate most with your ideal clients. 

Establishing these seamless communication channels is made significantly easier through the strategic deployment of interactive content.

Among the various tools available, Facebook polls offer a low-friction, highly efficient way to produce interactive content. This keeps your target audience consistently interested.

Utilizing this feature allows brands to build an active community rather than a passive recipient list.

Let’s explore exactly how to create a poll on Facebook under the platform's current ecosystem. 

Moreover, we can examine why local businesses find this tool indispensable and detail the exact frameworks required to maximize your poll's effectiveness.

What Are Facebook Polls
What Are Facebook Polls

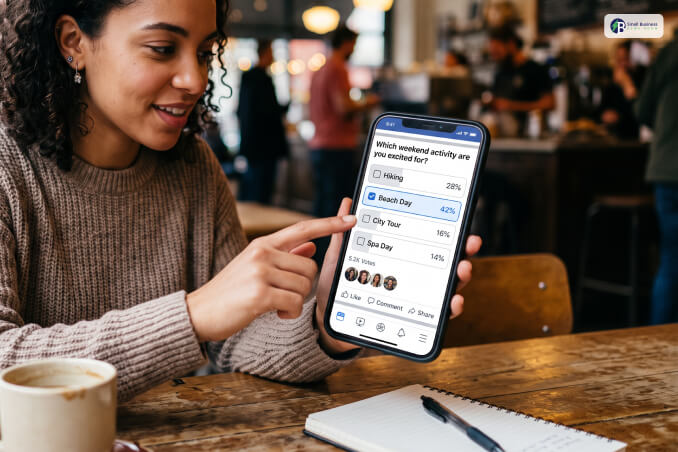
Facebook polls are interactive features that allow creators, businesses, and everyday users to pose questions with pre-defined response options.

Functioning similarly to digital giveaways or online competitions, polls excel at drawing users in and encouraging active participation. 

Digital attention spans continue to contract. Therefore, the brevity of a poll is its greatest asset. In addition, taking part requires only a fraction of a second, removing the friction associated with traditional multi-page surveys.

Crucially, polls allow respondents to view real-time data splits immediately after casting their vote. 

A significant portion of human curiosity stems from wanting to know if our personal opinions align with the broader collective. This instant gratification loop turns a simple question into an engaging user experience.

For businesses, these micro-interactions serve as a powerful springboard for extensive community discussions. 

Users frequently flock to the comment section of a poll to explain, debate, or defend their choices. This provides an excellent opportunity for brands to jump into the dialogue, respond with warmth, and nurture relationships. 

Furthermore, this flurry of activity signals strong engagement to the underlying Facebook algorithm, expanding your organic reach.

The 2026 Facebook Poll Ecosystem

Meta has integrated heavy redesigns into its platform infrastructure. This helps in focusing on privacy-focused, close-knit communities and ephemeral, short-form visual content. 

Consequently, the availability of native polling features looks vastly different today than it did in previous years. 

In order to plan your social media marketing strategy in an accurate way, it is essential to understand where native polls are fully supported. You also need to understand where they are restricted and what workarounds exist. 

Where You Can And Cannot Post Native Polls

Poll LocationNative AvailabilityBest Strategic Use Case
Facebook GroupsFull Support (Text & Images)Deep market research, product development, and fostering community loyalty.
Facebook StoriesFull Support (Stickers)High-visibility, fast-paced binary questions designed for mobile-first users.
Messenger & Live StreamsFull Support (Interactive)Real-time engagement during live broadcasts or within direct customer chat groups.
Business Page TimelinesNot Supported NativelyRequires alternative strategies like reaction polling or third-party links.
Personal ProfilesNot Supported NativelyRemoved to streamline standard feed layouts and prioritize personal status updates.

How To Create A Poll On Facebook: A Step-By-Step Guide

Since the classic “News Feed Poll” button has been completely phased out for personal timelines and standard business page feeds, creators need to deploy their interactive questions. That is, through Facebook’s active community hubs.

Method 1: Launching A Poll Inside A Facebook Group

Facebook Groups represent the most robust and permanent ecosystem for native polling. Additionally, groups allow you to present multi-option text queries and even attach images to individual answers.

  1. Open Facebook and navigate to the specific Facebook Group you manage or belong to.
  1. Click or tap inside the text box that reads "Write something..." to open the main post creator tool.
  1. Locate the extended formatting menu. On a desktop browser, click the three-dot icon at the bottom right of the window. On the mobile application, swipe up from the bottom menu tray.
  1. Select the Poll option from the list of features.
  1. Type your core question into the main text prompt area.
  1. Enter your individual answers into the "Add Option" slots. You can continue adding options as needed.
  1. Tap the Gear Icon (Poll Settings) to customize permissions. You can choose whether members can select multiple answers or if they are allowed to add entirely new options to the poll.
  1. Review your text and hit Post to take the poll live

Method 2: Creating A Visual Poll On Facebook Stories

Stories are highly effective for driving fast, time-sensitive engagement on mobile devices. These polls disappear automatically after 24 hours.

  1. Launch the Facebook mobile application and tap the Create Story button located at the top of your home feed.
  2. Select an image or video from your device’s camera roll to serve as the visual backdrop, or choose a clean, text-based background color.
  1. Tap the Stickers icon, which resembles a square smiling face, located in the upper right-hand editing panel.
  1. Select the Poll sticker from the options menu.
  1. Type your question directly into the text field.
  1. Tap the default "Yes" and "No" boxes to customize the text choices to match your specific query.
  1. Adjust the size and placement of the sticker on your visual asset, then select Share to Story.

Alternative Solutions For Facebook Business Page
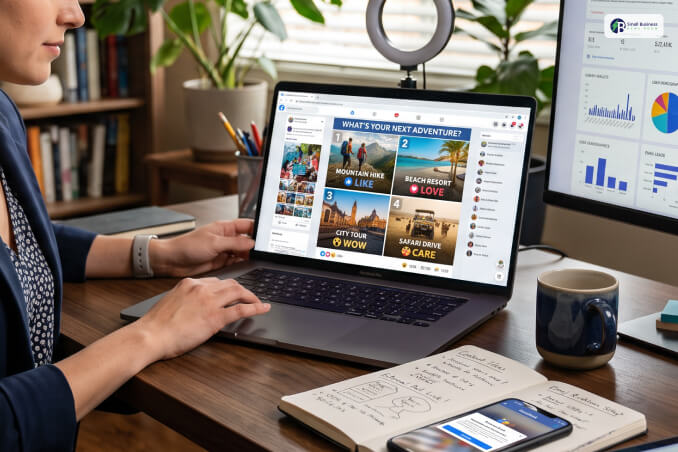
Alternative Solutions For Facebook Business Page

If your goal is to gather data directly on a public Facebook Business Page timeline, you can successfully implement several highly effective workarounds. In this case, the native polling buttons are absent.

The Emoji Reaction Poll

Design a custom graphic split into quadrants, with each quadrant displaying a different product or choice. 

Instruct your followers to vote by using a specific Facebook Emoji Reaction (e.g., "Like" for Option A, "Love" for Option B, "Wow" for Option C). 

Because the algorithm heavily weighs varied emotional reactions, these posts frequently generate massive organic reach.

External Survey Integration 

For deeper data analytics, build a secure, comprehensive poll using external platforms such as Google Forms, Typeform, or SurveyMonkey.

Write a compelling and punchy hook on your Facebook Page timeline and include the direct link. 

This allows you to collect organized user data and email addresses completely outside of Meta’s ecosystem. 

Maximizing Poll Engagement: The Five Core Rules

To ensure your interactive content drives tangible business growth, adhere to these five operational principles:

  • Orient Content to Location: Match the depth of your question to the medium. Use Stories for quick, fun, visual binary choices. Use Groups for long-form, strategic business feedback.
  • Keep Prompts Concise: A user should be able to read your question and understand the choices in under three seconds. Eliminate all fluff.
  • Gamify the Answers: Design choices that let users express their unique personality, humor, or regional pride.
  • Maintain Active Comment Moderation: Respond to users who leave text comments explaining their vote. This drives up the post's algorithmic value and builds customer loyalty.
  • Close the Feedback Loop: Always share the final results in a follow-up post. Show your audience exactly how their input is shaping your future business decisions.

Transforming Micro-Engagements Into Algorithmic Velocity

While a single digital vote may seem statistically insignificant in the broader scope of a multi-channel marketing campaign, these micro-interactions serve as the baseline fuel for Meta’s algorithmic distribution. 

Every tap on a story sticker, reaction to an emoji matrix, or vote within a group signals highly active user intent. 

This immediate feedback loop registers far more weight than passive screen dwell time, working directly to push your brand's future content higher into your followers' feeds.

Ultimately, mastering the mechanics of modern Facebook polling allows brands to transition from broadcasting information to cultivating real community ownership. 

By shifting your deployment strategies away from the obsolete timeline feeds and into high-impact environments like Groups and Stories, you actively lower consumer friction. 

The companies that thrive under the current digital framework are those that treat consumer feedback not as a data point. 

Instead, they treat it as the foundational element of their brand trajectory.

Learn More About:

Content Rally wrapped around an online publication where you can publish your own intellectuals. It is a publishing platform designed to make great stories by content creators. This is your era, your place to be online. So come forward share your views, thoughts and ideas via Content Rally.

View all posts

Leave a Reply

Your email address will not be published. Required fields are marked *

Related

how to delete a facebook page

Here Is How To Delete A Facebook Page Easily

Do you wish to know how to delete a Facebook page? This article is going to be your ultimate guide. We will walk you through the process of deleting your Facebook business page on both desktop and mobile devices with clear, detailed instructions. If you're still not entirely sure that you want to permanently delete your Facebook business page, we'll also offer you other options. But first, let's confirm that we are discussing the same topics. Your personal Facebook account, or profile on Facebook, is the one you use to interact with loved ones and watch wacky cat videos. You can share updates about your life with your Facebook friends and keep up with their activities. Depending on the pages you follow, you can even obtain your news from your news feed. On the other hand, a company typically creates a Facebook page to engage with clients, advertise goods and services, and broaden its online presence. This account is not private; rather, it is a component of a larger marketing plan. We'll go over everything you need to know about removing your Facebook business page in the section that follows. Go to the bottom of the post to find out how to remove your personal Facebook account. What You Need Before You Delete A Facebook Page Facebook no longer relies on the old “Page administrator” label alone. To delete a Page, your profile must have Facebook access with full control. Task access may let you publish posts, answer messages, view insights, or work inside Meta Business Suite. It does not give you permission to delete the Page. You can check your access before starting: Switch from your personal profile to the Page. Open Settings & privacy and select Settings. Go to Page setup and choose Page access. Find your name under People with Facebook access. Confirm that your access includes full control. If you do not have full control, ask someone who does to change your access. Meta explains the current permission levels in its Facebook Page access guide. Facebook deactivates a Page as soon as someone requests deletion. The Page then enters a 14-day recovery period. If nobody cancels the request within that time, Facebook permanently deletes it. Therefore, save any information you may need before confirming the request. Should You Delete, Deactivate, Merge, Or Remove The Page? People often delete a Page when they only want to hide it or remove it from a business account. Facebook provides several actions, and each one produces a different result. Your goalCorrect actionWhat happensHide the Page for nowDeactivate the PagePeople cannot find the Page, but you can reactivate it later.Close the Page permanentlyDelete the PageFacebook deactivates it immediately and permanently deletes it after 14 days.Combine two similar PagesMerge the PagesMeta combines eligible Pages and removes the Page being merged.Detach it from Meta Business SuiteRemove it from the business portfolioThe Page remains on Facebook but is no longer part of that portfolio.Stop one person from managing itRemove their Page accessThe Page stays active, but that person loses access. Deactivation is the safer option when a business is taking a break, changing its name, or rebuilding its content. Meta confirms that deactivating a Page does not delete it. Merging works only when Meta considers the Pages eligible, usually because they represent the same business or subject. You can review the current Facebook Page-merging requirements before choosing this option. Removing a Page from a Meta business portfolio is also different from deleting it. Use that option when your problem concerns business ownership or Meta Business Suite access rather than the public Page. How To Delete A Facebook Page In 2026 Facebook uses nearly the same deletion menu on desktop and mobile. You must switch into the Page before opening its settings. Delete A Facebook Page On Desktop Sign in to Facebook. Click your profile picture in the upper-right corner. Select See all profiles and switch to the Page you want to delete. Click the Page’s profile picture. Open Settings & privacy, followed by Settings. Select Access and control from the menu. Choose Delete Page and click Continue. Review the information shown on the screen. Facebook may offer options to download or transfer your Page information. Enter your password if Facebook asks for it. Confirm that you want to delete the Page. Delete A Facebook Page On Android Or iPhone Open the Facebook app. Tap your profile picture or the Menu button. Use the profile switcher to select the Page. Open Settings & privacy and tap Settings. Tap Access and control. Select Delete Page. Tap Continue and follow the confirmation prompts. Meta occasionally changes the position of individual menu items. However, Access and control currently contains the deletion option. You can compare your screen with Meta’s latest Page deletion instructions. Once confirmed, Facebook deactivates the Page immediately. Permanent deletion takes place after 14 days unless you reactivate it. Complete This Page Exit Audit First Deleting a Page can remove years of useful business history. A quick Page exit audit protects the information that may still have legal, marketing, or customer-service value. Before deleting the Page: Download a copy of the Page, and open the downloaded file to confirm that it contains what you need. Save important photographs, videos, posts, customer conversations, leads, reviews, and performance reports separately when necessary. Record the Page username, URL, Page ID, final follower count, and important campaign results. These details can help with old invoices, brand records, ownership questions, and future marketing reports. Review scheduled posts, active advertising campaigns, connected business tools, and any linked Instagram account. Handle each connected asset separately instead of assuming that Page deletion will remove or preserve everything. If the business has moved or changed its name, publish a final notice that points customers to the new Page, website, email address, or support channel. Tell other people with full control about the decision. This reduces the chance of someone cancelling the request or recreating a duplicate Page without knowing the original plan. Treat the Page as a business record, not simply as a social profile. Once the 14-day recovery period ends, access to its old content may not return. Deleting A Facebook Page Is Not The Same As Deleting Your Account A Page represents a business, organization, brand, or public figure. Your Facebook account contains your personal profile and provides the access used to manage Pages. Facebook gives a Page a 14-day deletion window. A personal account has a 30-day cancellation period. Combining these two time limits can cause someone to miss the Page recovery deadline. To delete a personal Facebook account in the current interface: Open Settings & privacy and select Settings. Go to Accounts Center. Select Personal details. Open Account ownership and control. Choose Deactivation or deletion. Select the account or profile. Choose Delete account and tap Continue. Meta provides the complete process in its personal Facebook account deletion guide. Check every Page you manage before deleting your account. If your profile is the only one with full control, the connected Pages may also lose their active manager. Give another trusted person full control first if any Page needs to remain online. Why Can’t I Delete My Facebook Page? A missing Delete Page button usually points to an access or profile problem. It does not always mean that Facebook has removed the feature. What you seeLikely reasonWhat to doYou cannot find “Access and control”You are using your personal profileSwitch into the Page and open its settings again.You can post but cannot delete the PageYou have task access or partial controlAsk someone with full control to upgrade your Page access.The Page appears in Business Suite onlyBusiness portfolio access and Page access are differentCheck both the portfolio permissions and the Page access list.Your access changed without your approvalAnother person with full control may have edited itContact the remaining full-control user or submit a Page access request.The app shows an older menuYour app or interface has not received the same layoutUpdate the app or complete the process through a desktop browser. Only someone with Facebook access with full control can delete a Page. Being able to create content, answer messages, run advertisements, or view reports does not prove that you have that level of access. If the Page belongs to another business or person, you cannot ask Facebook to delete it simply because you no longer want it online. The owner must give you the required access or handle the deletion. If you lost legitimate access to a Page you manage, follow Meta’s Page access recovery guidance. How To Stop Facebook From Getting Deleted? As previously mentioned, you can stop a page from being deleted for thirty days after you decide to delete it. If you decide to change your mind, simply take these actions: Click on your picture in the upper right corner of Facebook when it's open. From the dropdown menu, select Settings & privacy and then click Settings. Click "Your Facebook information." Lastly, select "View" from the menu, then click to bring up the reactivation page. Did You Receive A “Your Page Will Be Deleted” Message? A message that threatens to delete your Page is not the same as a deletion request you submitted through Facebook settings. Scammers often create urgent messages that ask Page owners to open a link, appeal immediately, enter a password, or pay a fee. Do not use the link inside an unexpected message. Open Facebook yourself and check the Support Inbox: Open the Facebook menu. Select Help & support. Open Support Inbox. Look for a matching notice from Facebook. Meta uses the Support Inbox for account alerts, reports, and platform messages. If no matching notice appears, treat the original message with caution. If you entered your password on a suspicious website, change it immediately. Review recent logins, remove unknown access, and turn on two-factor authentication. Meta also provides recovery steps for people who believe they have been phished on Facebook. Before You Delete You should download the data from your Facebook page before deleting it. To obtain your data: Navigate to that page and choose "Settings." Locate the "Download Page" option by navigating to the "General" section. Click "Download Page" after selecting "Edit." One wise move to make the most of your social media assets is to delete any outdated or irrelevant business pages. You can also collect data, automate content creation, and analyze trends with the right software. To locate the best social media software for your company, start here. A Final Check A Facebook page is different from a profile. Your user profile represents you as an individual. It's where you interact with friends and maintain control over the privacy of the information you share.  A page is a public representation of a person, place, business, organization, or group that other people on Facebook can like and follow. Once you have initiated your account's deletion, Facebook gives you a 14-day window to rescind your decision. Within that timeframe, you can reinstate your account to its previous glory without losing any of your data.  To do so, simply log into your account as you normally would, using any browser of your choice or via the Facebook app. After 14 days, you lose your account permanently. So before you get too curious about how to delete a Facebook page, make sure you are ready to let go permanently. With the information we just provided, you can delete any type of Facebook page that you may have created in just a few moments.  Have you had any challenges deleting your Facebook page? How did you overcome it? Let us know in the comments. Additional Reading: How To Stop Scammers On Facebook Marketplace? Facebook Settlement: When It Will Pay Out and How to Verify It What Is Facebook Touch? Everything You Need To Know About It

READ MOREDetails
How-To-Recover-Deleted-Facebook-(feature-i-mages)

How To Recover Deleted Facebook Messages Using Com.Facebook.orca? – With Pictures

Have you deleted your Facebook messages recently and want them back at any cost? If yes, then this article is for you! Missing important messages can be annoying, especially if you know that it is going to be a tough task to recover them. In this world, it is very difficult to undo most of your actions. But there is a chance to recover your deleted messages on Facebook on both android and PC by using Com.Facebook.orca.  I understand that many important chats and conversations take place on Facebook Messenger. Facebook is one of the most used social media platforms, with more than 2.7 billion individuals using it all over the world.   What Is Com.Facebook.Orca? Com.Facebook.orca is basically a folder that belongs to the Facebook traveler app. In Com.Facebook.orca folder, all plug-ins, cache, videos, audio files, photos, and other varieties of information are stored. However, you don’t have to create or download this folder. If you have Facebook or Messenger, this folder is created automatically. You must view the size of the folder from time to time because it takes a huge space on your phone’s storage.  Thus, if you wish, you can delete this folder by uninstalling the Facebook Messenger app from your Android device. But keep in mind, after deleting this folder, if you wish to recover your deleted messages, you may have to delete your Facebook or Messenger app and reinstall it. This is done to create Com.Facebook.orca folder automatically.  Will Com.Facebook.Orca Harm Your Device? As already discussed above that Com.Facebook.orca is a folder that is already installed by default on your device. This folder is created by Facebook Messenger. However, if you have deleted this folder and wish to reactivate it, then you have to reinstall your Messenger. Now, the main question that arises here is ‘Will Com.Facebook.orca harm your device?” and the answer is absolutely not. It’s just a folder to recover your deleted messages and not a virus that can harm your device. How To Recover Deleted Facebook Messages On Computer? The steps to recover deleted Facebook messages on a computer will differ slightly from recovering deleted messages on a laptop. Thus, the steps listed below are some of the steps that you need to follow for the same. i). Use a USB cable, and connect your mobile or tablet with the same. Now, go to MyComputer, File Explorer, or ThisPC, depending on your Windows version. ii). You need to double-click the device to access the file. Again, double click on the internal storage. iii). Click on a folder named Android and then click Data folder. iv). Go to the Application folder. v). Search Com.Facebook.orca, and double click on this. vi). Then, you will find fb_temp in it. Copy it. vii). First, uninstall Messenger and then again reinstall it. viii). Don’t log in to your Facebook Messenger at the moment. First, you need to paste the fb_temp in the cache folder. ix). Now, it’s time to login using your Facebook account. At the same time, if you get the cache, open the fb_temp file and then select the messages that you would like to be recovered and paste. That’s all set! All deleted messages will now be displayed on your Messenger app, and you can view this at any time you want to.  How To Recover Deleted Facebook Messages On Mobile? If you want to recover messages on mobile, then the steps will differ from the above-listed ones. Recovering deleted messages on mobile is far easier and simpler, and you will love the steps below for sure. i). Go to the File Explorer of your device. Don’t use the default file messenger. It is preferred to take the help of a third-party app, such as ES File Explorer.  ii). Go to SD Card or Storge in the file explorer, depending on your device’s storage location, to recover deleted messages using Com.Facebook.orca. iii). Click on the Android folder and then tap on Data. Again, click on the Application folder and then on Com.Facebook.orca.  iv). Then, you will be able to view the cache, and then you can proceed to open that specific folder. v). Copy fb_temp that you are able to view right now. Create a folder and paste it over there. vi). Uninstall Facebook Messenger after completing the above steps.  vii). You can go to the Cache folder after installing the app—paste fb_temp in the cache folder. viii). Then, again reinstall it using your Facebook account. Soon, you will be able to see and access all your erased messages. Steps To Fix Com.Facebook.orca Error Sometimes, you may face Process Com.Facebook.orca errors as this may have stopped working. The process could end abruptly or shatter whenever there is an issue. This error generally occurs when an app or any technical issue affects the smooth running of the Facebook or Messenger apps. Now, to fix Com.Facebook.orca error, you need to follow the below steps. Have a look! Open Settings on your android device. Find Applications on Setting and click on it. Use the Search bar to find this folder.  In the Application folder, you will get an option of All Apps. Then, search for the Messenger app on the listed apps and then select ‘Clear All Data.’ You may be required to restart your Android device and open your Facebook or Messenger app and use them like before without any difficulties.  Thus, this indicates that Com.Facebook.orca error has been solved. Another way to solve this error is to install the app and reinstall it from your Google Play Store. Can You Recover Deleted Facebook Profile? You can, of course! The company has increased the grace period for deletions from two weeks to thirty days.  This implies that you have approximately a month from the time you delete your Facebook account to change your mind. Facebook later extended the grace period because, according to the company, they saw many users attempting to recover their deleted accounts even after two weeks had passed. As a result, users must now wait up to a month for the account and all of its contents to vanish forever. Frequently Asked Question Q1: Is There Any Difference Between Facebook Katana And Facebook orca? Facebook Katana is a codename for the Facebook applications on Android devices. Orca is for messenger applications. And Facebook. Katana is the code name for a Facebook application. This is the difference between the Facebook Katana and the Facebook Orca. Q2: Can Anyone Retrieve The Facebook Secret Conversations? Any type of secret conversation has the keys for encryptions. It can disappear after a certain time. But Facebook can still have access to the decryptions. The secret conversions of Facebook can be retrieved. Q3: How To Know That Someone Has A Hidden Message On Messenger? If someone has hidden messages, you can easily tell by seeing their message bubbles. Usually, the message bubble's colors are blue. But when you have the secret chats, the colors turn black. By seeing the colors, you can tell if the messages are hidden or not. The Final Thoughts Facebook accounts are reflections of our lives, memories, and relationships in the wide world of digital interactions. Even though it might seem difficult to recover an account or even a message that has been permanently deleted after 30 days, it's important to keep in mind that there are procedures and safeguards in place to help. Make sure you are always aware of the consequences of the decisions you make online. In the event that you encounter a comparable circumstance once more, consult this guide and act quickly. Always remember to stay informed, stay connected, and protect your digital memories. Now, you know pretty well how to use Com.Facebook.orca to recover your deleted Facebook messages on both your computer and PC. So, now you know that there is a secret folder (Com.Facebook.orca folder) lying on your Android device. Hence, the above steps will help you to get your lost messages on Facebook easily. Read Also: How to Plant Grass Seed on Hard Dirt? YouTubNow: An Honest Review Top Easy Way To Fix Avast UI Failed To Load Error 2 Easy Steps to Change the YouTube Channel Name

READ MOREDetails
facebook message sent but not delivered

How To Fix “Facebook Message Sent But Not Delivered” Error?: A Complete Guide

Billions of people use social media on a daily basis. Among all the social media platforms that are used by people on the internet, Facebook is the most popular one. However, despite being highly popular and efficient, Facebook still has many issues. One of the most common messages that people face in Facebook Messenger is the error of Facebook message sent but not delivered. In this article, we will discuss what it means when a Facebook message is sent but not delivered, as well as the best ways to fix this error through the Facebook website and the Facebook Messenger app. Furthermore, we will also discuss why the error is happening as well as different ways of fixing the error so that you can deal with the problem quickly. Facebook Messenger Message Sent But Not Delivered – A Few Reasons Since millions of people use the Facebook social media platform, as well as the Messenger app of Facebook, it is bound to get some glitches. Hence, it happens that many messages do not get delivered. This can get annoying sometimes when you are in a hurry and want to send an urgent message to a friend or a family member through Messenger. Facebook Messenger Message Status When you hit the send button on Messenger, the app shows different symbols at the end of your message to indicate its status at the moment. Make sure that you are aware of the message status on Messenger: As you are now aware of the different statuses of your message, it is time now for you to get an idea of the reasons why you are facing the problem of a Facebook message sent but not delivered: 1. The Recipient Might Be Ignoring You It might be that the person to whom you are sending the message is not in the mood to chat with you. The recipient might have seen the message in the phone notification and decided not to open Messenger. However, your message status will show delivered. 2. The Recipient Deleted Your Message The recipient also has the option to delete the message without opening it through Messenger. After looking at the message through notification, the recipient might have opted to delete it so as to ignore chatting with you. 3. Your Message Got Marked As Spam Image Source: wikihow.com Your friend might have accidentally marked your message as spam. Hence, the message got stored in the Spam folder of Messenger. Your message got deleted from the inbox of the recipient as a result. 4. The Recipient Is Logged Out Of Facebook Messenger If the recipient is not logged in to the Messenger app or might have uninstalled the app from his/her phone, your message will not get delivered as a result. Once the person logs in to the Facebook account, your message will indeed get delivered. 5. The Message Is Stored In The Message Request Folder If the person to whom you are trying to send your message is not on your Facebook friends list, your message will not get delivered. This will, in turn, get stored in the person’s Message Request folder. Facebook Message Sent But Not Delivered – The Best Solutions Image Source: cdn.windowsreport.com One of the most common reasons for the case of a Facebook message being sent but not delivered is that a glitch is happening due to many people using the app at the same time. There might also be some delay in the network, as the message is not getting sent at the right time. Apart from that, there might be a problem with the Messenger server at the moment. 1. Try Messaging Using The Facebook Website Image Source: icebergwebdesign.com If your message is not getting sent through the Messenger app, you will need to log in to your Facebook account using your web browser, either through your phone or a computer. Check whether you can send a message through Facebook chat or not. 2. Your Phone Needs A Restart Image Source: gotechtor.com Smartphones also experience glitches sometimes. If you restart or reboot your device, all the network issues get solved. See whether the problem is still there or not. 3. Try Messaging Others Image Source: resources.stuff.co.nz You can check your Messenger app by messaging other friends on your friend list. If you can send messages to other friends, and your message shows delivered, then you are probably blocked by that friend. If other friends do not receive your message, there might be other problems. 4. Facebook Message Sent But Not Delivered – Restart Your Messenger You can switch off the Messenger app by going to app management on your phone settings and restarting the app. This way, the data flow through the app becomes better, and it will probably fix the problem. 5. Try Reinstalling The App If restarting the app is not working for you, try uninstalling the Messenger app. Go to the App Store or Play Store and install Messenger again to see whether the problem is solved or not. 6. Reach Out To Facebook Support If none of the solutions mentioned above worked for you, try going to the "Help & Support" section on your Facebook app and clicking the "Report a problem" option. There, you must select the option named "Something went wrong.” In this way, you can share your problem with Facebook’s support. Troubleshooting Tips From Facebook   Facebook has three possible reasons to account for why your messages are not getting delivered: "You sent a lot of messages recently. Your messages went against our Community Standards. This may cause your account to be temporarily restricted and prevent you from replying. There may be problems with your app, device or internet." Facebook's own website has apt solutions in cases where your message does not get delivered. Here is what it says: "Update your Messenger app to the latest version. Connect to a reliable Wi-Fi network. Make sure your device has enough storage. Close your Messenger app and restart your device. Make sure the person you’re replying to hasn’t deactivated or deleted their account. Make sure you haven’t blocked the person you’re replying to and they haven’t blocked you. If you’re replying to a group chat, make sure the other members haven’t left the conversation." In cases where you may be blocked by Facebook from sending messages, here is what Facebook says: "This block is temporary. You can still connect with your confirmed friends through the Facebook app or www.facebook.com while you're in this block by leaving comments on posts, posting on your profile, or using other Facebook features. If you can't send messages, you may also be temporarily blocked from sending friend requests. If one of your messages was removed and you think it follows our Community Standards, tap on the notification about the message removal. You may be able to let us know that you disagree with the decision. Learn more about requesting a review." To be able to send messages in the future, Facebook has the following tips: Use the name you go by in everyday life to help the people you're messaging recognize you. "Once your block is over, please send messages and friend requests only to people you know. Learn more about our policies from our Community Standards." Summing Up These aforementioned solutions are enough to get your problem solved in a few minutes. However, if you still face the problem, just wait for a few days, and try these solutions again. The reasons for these problems can be anything. All you need here is to find out what problems you have and use these solutions to solve the problems you have in your Messenger app. In addition, you can also resend the message to the recipient again to see if this time the message is received by the person or not. Thereby, you can find out whether the problem is still there or not. Read Also: Why A Business Should Use Facebook Remarketing? Bored So Much: Learn How To Play Games On Messenger How To Recover Deleted Facebook Messages Using Com.Facebook.orca?

READ MOREDetails